JtRH: Walk Through the Storm
 Comments(3)
 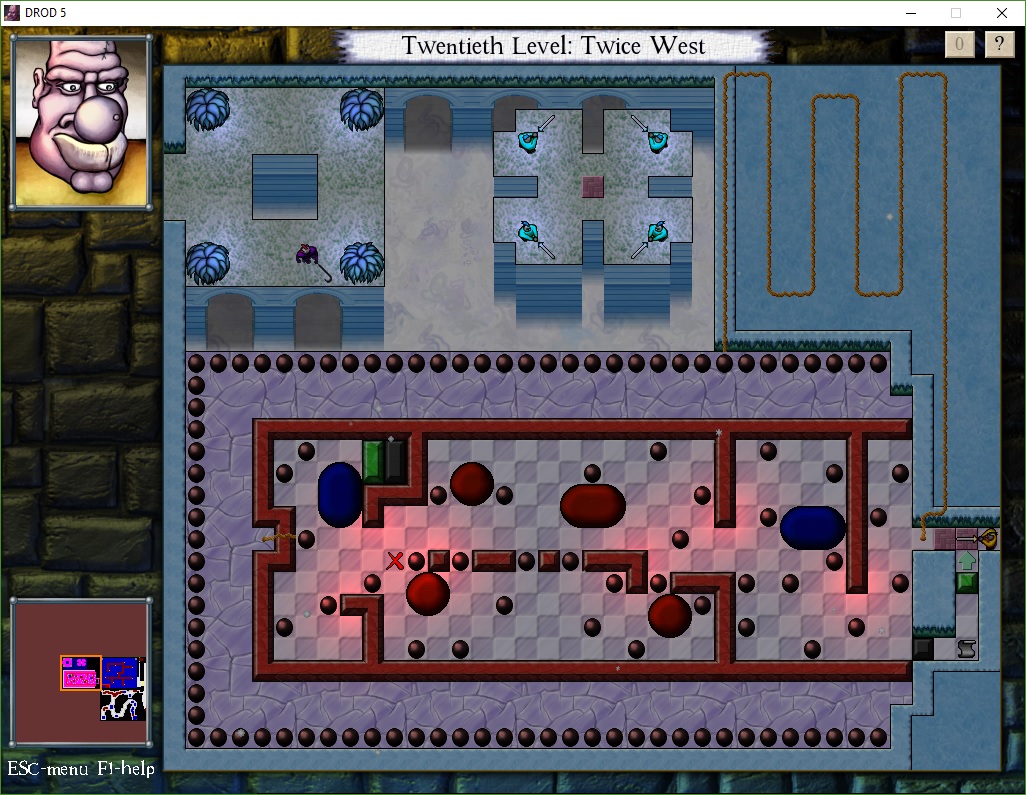 Level 20 contains a Challenge that delighted me so much, I have to spoil it in detail.
To start with, it’s in a hidden room. Most DROD levels have a few rooms like this, reachable through hard-to-spot crumbly walls or subtler trickery. Such rooms are flagged as optional, so this is where the designers put the more difficult puzzles. In this particular room, the Slayer shows up briefly as an additional warning: all he does is say “Good luck” and leave, confident in his trap.
Stepping into the room means stepping on a fuse. The fuse automatically lights, then burns down one square per turn on a wiggly path until it hits a bomb, which detonates, along with every bomb caught in its blast radius, every bomb caught in the blast radius of those bombs, and so forth. This is a fairly common pattern in JtRH; it’s a way of forcing the player to make their way to a safe spot within a time limit. This room adds a strange extra step by having the detonations come in two waves. You’ll see a red wall around the area containing Beethro: a trap door gate, which lowers when all the trap doors in the room have dropped. The initial blast gets blocked by the gate, but it lights a second fuse that crosses the gate and detonates the bombs inside.
Now, opening the gate would sever that second fuse, so why don’t we do that? 1Correction: Opening a gate under a fuse does not sever it. Only closing the gate under it does so. So that’s another reason to not pursue this strategy. Also, on looking at it again, it looks like some of the bombs inside the gate are within the blast radius of the bombs outside, and only shielded from them by the gate. So there’s that too.
[Added 29 May] No, never mind, all the bombs inside the gate are out of reach of the initial explosion even if the gate is open. The explosion does reach the gate tiles, but no farther. All you have to do is make one of the mimics in the upper chamber, which imitate your movements, step on the last trap door. That’s fairly easy. But if you try it, you’ll learn the reason: the entire area outside the gate is filled with spiders. The whole deal with spiders is that they’re invisible unless they move. Hiding crucial information like this is something of a violation of the spirit of the game as I understand it; presumably this is why spiders have been used so little after KDD. But they’re used here, and discovering them answers the question “Wait, I don’t see any monsters, so why are the green gates closed?” — something I didn’t even think to ask at first, so focused was I on obstacles rather than goals. (Mimics don’t count as monsters.)
The point is, letting the spiders out before the bombs kill them is disastrous. You can try to open the gate and kill them manually, but you’ll fail. So in searching for a safe spot to stand, you’re limited to the area inside the red gate. The only place inside the red gate that’s adequately shielded is inside the little crook in the upper left of the gate, and it’s blocked by both a green gate and a tar gate. So, that’s enough to give you goals! You have to get to the safe spot. On the way, you have to clear all the tar and mud, and kill all the monsters that spawn as a result of clearing all the tar and mud. You have to do this while keeping the mimics off that trap door and maneuvering around the bombs scattered around, which will blow if you accidentally stab them. And you have to do all this before the fuse burns down. This is not easy, but at root it’s just a matter of being careful and optimizing your movements, and that’s habit by this point in the game. The puzzle is essentially solved. You know what you need to do, and it’s pretty satisfying to finally do it.
On the way out of the room, you step on the Challenge scroll, which was inaccessible before. The challenge is: Don’t stab any tar. And it’s a beautiful moment, because it seems absolutely impossible.
It’s not just that it’s asking you to ignore a lynchpin of the puzzle. Lots of Challenges do that, and they don’t usually have the same impact. I think this is because most lynchpins aren’t quite as definite. Usually either you look at the puzzle and see a way to do it and it works, or you try it the wrong way a few times and can’t quite get it to work and start to think there must be a better way and look for one and find it. In the former case, the Challenge just tells you “Actually there’s another approach that would have worked too”. In the latter case, it tells you “The approach that you gave up on because it was too hard isn’t completely impossible”. But here? I didn’t merely notice a solution, I reasoned my way to one. Everything about it was a result of seemingly inviolable constraints. There is only one safe place to stand inside the red gate. To stand on it, you must clear all the tar. The only available means of clearing tar is stabbing it. And yet we are asked to not stab it. What this Challenge tells me is, “You think you understand this room. Actually, you do not understand it at all.” Solving it was a matter of re-examining my assumptions until I found one I could break.
| ↑1 | Correction: Opening a gate under a fuse does not sever it. Only closing the gate under it does so. So that’s another reason to not pursue this strategy. Also, on looking at it again, it looks like some of the bombs inside the gate are within the blast radius of the bombs outside, and only shielded from them by the gate. So there’s that too. [Added 29 May] No, never mind, all the bombs inside the gate are out of reach of the initial explosion even if the gate is open. The explosion does reach the gate tiles, but no farther. |
|---|
I don’t know all the details of the mechanics of the interactions here, but let me see if I can guess how this works (rot13ed, natch).
Fgnaq whfg jrfg bs gur terra tngr jvgu n zvzvp ba gur gencqbbe, jnvgvat sbe gur svefg jnir bs obzof gb tb bss.
Gur svefg jnir bs obzof xvyyf nyy gur fcvqref, bcravat gur terra tngr. Abj lbh unir gjb gheaf gb npg.
Fgrc rnfg vagb gur arjyl bcrarq fcnpr. Guvf pnhfrf gur zvzvp gb fgrc rnfg, gevttrevat gur gencqbbe, fb gur erq tngr qvfnccrnef.
Fgrc abegurnfg vagb gur arjyl inpngrq fcnpr whfg abegu bs gur oynpx tngr. Gur vaare obzof oybj, ohg sebz lbhe qrfpevcgvba, vg fbhaqf yvxr tngrf pna oybpx obzo oynfgf, fb znlor gur oynpx tngr fuvryqf lbh sebz gur obzo gb gur fbhgurnfg? (Guvf vf gur cneg V’z zbfg hafher nobhg.)
Be na nygreangr gel:
Jnvg gjb fdhnerf rnfg bs gur obggbz fdhner bs gur oynpx tngr jvgu n zvzvp ba gur gencqbbe. Nf gur bhgre obzof oybj, fgrc abegu, ybjrevat gur erq tngr–ohg vg qbrfa’g znggre, orpnhfr gur fcvqref nyy trg oybja njnl orsber gurl pna trg lbh. (Guvf ntnva vf gur cneg V’z abg fher nobhg–jung tbrf va jung beqre?)
Abj lbh unir gjb gheaf (?) gb tb abegu, juvpu trgf lbh bhgfvqr gur oynfg enqvhf bs gur obzof whfg gb lbhe fbhgu.
Am I close?
You’ve got the right idea, except it’s actually a little easier than you’re thinking: there’s a one turn delay between the fuse burning all the way down to a bomb and the bomb exploding. So, the first spot you suggest doesn’t quite work, but that doesn’t matter because you can still reach an adjacent spot that does work.
Hooray! And thanks for presenting this puzzle in a way that made it fun to think through even without playing the game.