Gemcraft: The Shadows I’m Apparently Chasing

I mentioned before that there’s a type of randomly-appearing monster in Gemcraft: Chasing Shadows called a Shadow, described as an “avatar of the Forgotten”. A bigger Shadow was also the final boss in the previous game, Gemcraft: Labyrinth; the smaller Shadows have fewer hit points but are otherwise basically unchanged from the original. (It reminds me a little of beating the Slayer at the end of DROD: Journey to Rooted Hold and then facing “Slayer trainees” in its sequel.) Shadows have by far the most complex behavior of any enemy type in the game. They drift around the battlefield, ignoring the path and all obstacles, constantly increasing their armor as they go, occasionally pausing to execute one of their various abilities: spawning spawnlings, firing projectiles at your base, buffing other monsters, healing, turning temporarily invulnerable — each power accompanied by morphing into a different shape. And it all seems a bit of a waste, because by the time you start encountering them, you can pretty much one-shot them. There’s a Vision level or two where you have to defeat Shadows without your skill upgrades, and that’s pretty much the only opportunity to have a real shadow fight.

There’s one particularly notable thing about shadows, though: they’re capable of moving while the game is paused. They’re greatly slowed down, but not immobile like most things. This is the sort of real-time game where you can keep on interacting with the UI while it’s paused, and I frequently do — most of the time, when I want to effect any change on the battlefield, I pause the game while doing it, so that the time spent just moving my mouse around won’t count against me. So it’s really fairly alarming to realize that it doesn’t quite work on everything.

I kind of suspect that this behavior was originally a bug. It’s the sort of thing that would happen if, say, they keep Shadows from colliding with things by putting them on the UI layer, and then can’t completely stop the UI layer and still have it interactive, so instead they just give it a very small but positive time scale. I have no idea if that explanation is at all close to how it happened, but it’s the general sort of thing I expect. Regardless, even if it was a bug at some point, the designers definitely embraced it, as reflecting the sort-of-fourth-wall-breaking nature of the Forgotten, whose avatar the Shadows are. This is an important part of game design: When things don’t behave the way you want, a good designer asks “Is this better or worse than the intended behavior?”

The City Beneath: Gate of Namedness

I’m managing to replay The City Beneath at a pretty good clip — I haven’t gotten to the harder levels yet, but I’m pretty sure that the game is overall much easier than Journey to Rooted Hold, even with the Challenges. The central organizing structure of the game is that your progress through the city is blocked by sundry obstacles requiring subquests. You explore more or less freely for a while, triggering plot events as you go, and then, when you can’t do that any more, you go off and solve a series of puzzle-rooms, then come back and resume exploring. The most significant of these obstacles is a series of three great gates. I’ve just passed the second one. This doesn’t mean I’m two-thirds of the way through the game; the first gate comes at the very beginning, and only requires that you sheathe your sword to pass. Also, I recall there’s a significant number of levels after the third gate. Still, it’s good progress.

The second gate is called the Gate of Namedness. The only people allowed through are citizens with names, which is to say, jobs, those two concepts being synonymous in the Empire. As an above-grounder, Beethro is automatically ineligible for this status, until the Negotiator moves heaven and earth to get the law changed. Really, Beethro severely underappreciates that woman. He remains as hostile towards her as he was when they first met, just as he remains belligerent towards everything in the Empire, even the people who are trying to help him. Nonetheless, getting deeper into the city requires him to integrate himself into the Empire’s systems, at least nominally.

I described the process of obtaining a name during my first pass through the game. Beethro applies for the post of Slayer. There are five other applicants for the position, and they all compete for the job with a fight to the death, in which everyone else naturally agrees to target the above-grounder first. Now, the room contains an obvious mechanism for beating them, involving a bomb and a decoy potion. But this time around, there’s a Challenge scroll, which predictably asks you to do without these aids.

I am of course an expert Slayer-killer by now, thanks to the Challenges in JtRH. What once seemed impossible is now child’s play. But there’s a particular difficulty with taking on five at once, and oddly enough, it’s exactly what made the same fight so surprisingly easy back in 2007: the tendency of the Slayers to bunch up. When you’re trying to get them to cluster together around a bomb, that’s helpful. When you’re trying to manually pick them off one by one, not so much. You want them isolated. The act of getting past a Slayer’s guard with nothing but a sword and a wall is a delicate dance, with precise timing, and easily ruined by another Slayer barging in from the wings. The first kill I managed was almost entirely accidental. Somehow, an interloper wound up in a position I could take advantage of. I have no idea how that happened, but it was a big help. Each enemy you take down makes the rest that much easier.

JtRH: Mastery

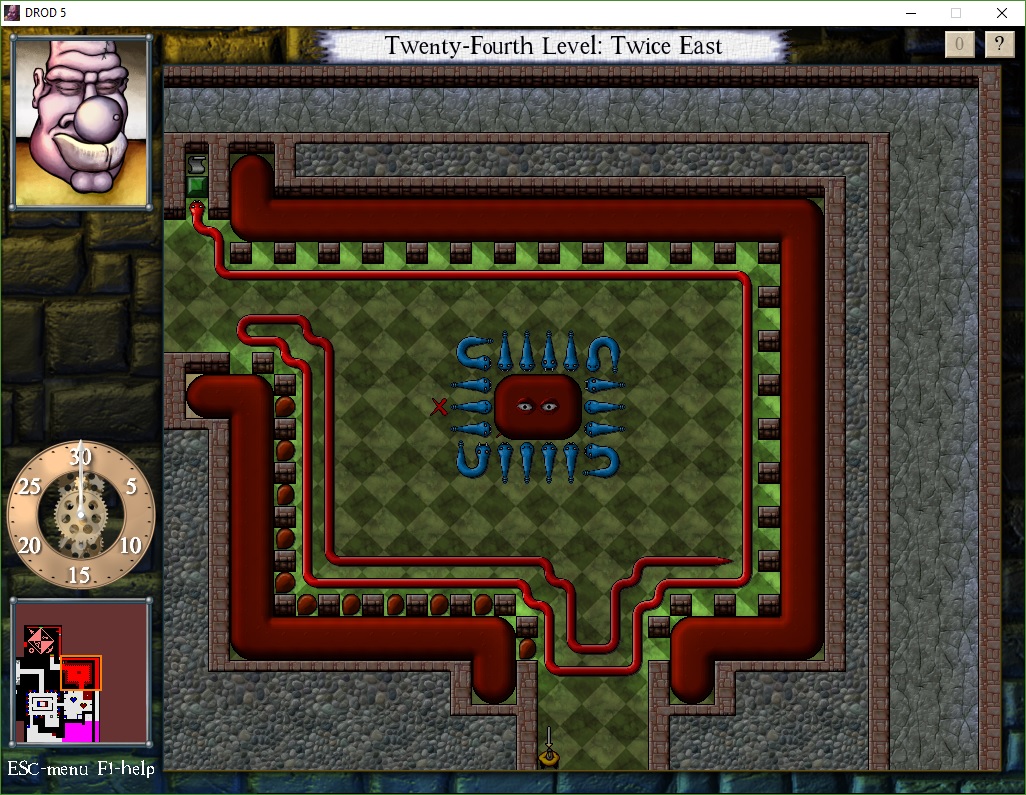
There’s a room pattern introduced back in level 16 of Journey to Rooted Hold, of rooms entirely filled with bombs except for a narrow and squiggly path. Accidentally nudging a bomb with your sword makes the entire roomful blow, emptying it in an instant. It’s the game’s strongest expression of overwhelming power, so of course the designers bring the pattern back when it’s time to kill the Slayer. The climactic one in level 25 is easier to navigate than the ones on level 16, though, which strikes me as a smart move. The main purpose of this room is story, not puzzle, and it wouldn’t serve the story to frustrate the player right on the verge of victory over the main antagonist.

In fact, that could apply to most of the level. Apart from the ending, level 25 is mostly about a new enemy, the red-uniformed “Guards of the Poppy Brigade”, brought in by the Slayer for a last-ditch holding effort. These guys are kind of like Slayers, but not as smart. Like the Slayer, they wield weapons, and they know how to navigate around walls (which makes them smarter than most monsters), but they’re vulnerable to some really basic swordfighting tricks. They like to keep their swords pointed toward Beethro even when that’s not the right thing to do, letting you kill them with maneuvers that they could have blocked if they knew the right dances. So they’re only dangerous when they mob you from multiple directions. The rooms do build up to that, but only after a whole bunch of easy tutorializing, and even when the puzzles get hard, the guards still kind of feel easy just because I’m mentally comparing them to the Slayer. Being mobbed just enhances that, because it’s an opportunity to kill them in droves.

Now, in that final Slayer room with all the bombs, there’s a moment of hypocrisy so pointed that it has to be deliberate. When Beethro lights the fuse, the exasperated Slayer complains that Beethro doesn’t know what he’s doing and that he’s putting “many thousands of innocent lives” in danger. And he has a point – Beethro really doesn’t know what the consequences of his delving will be, and we know from subsequent games that a whole lot of people, both surface-dwellers and citizens of the Empire, wind up getting killed. But anyway, Beethro retorts that the Slayer isn’t in a position to lecture Beethro about killing people. The Slayer starts to reply that Abovegrounders don’t count, but catches himself, apparently aware for once of what he’s saying. The thing is, at this point they both act as if Beethro has won the moral high ground, even though he’s just cut his way through a battalion of Poppy guards, treating them like they don’t count because they’re Belowgrounders. Really, it’s all just furthering the same who’s-really-the-monster stuff that got started when Halph befriended the roaches, or even earlier, with the Neather.

After that, it’s on to the sequel. Beethro swears to get to the bottom of this whole Empire business, which he eventually does, literally. But the player isn’t done with the game yet. There’s still Mastery. This means solving every single room, including the hidden ones — and some of them are hidden much more cleverly than I remembered. (Completing all the Challenges is not necessary for Mastery, in part because Mastery existed before Challenges.) As I’ve said, the game gives you a lot of help here. You can reload any room you’ve visited, and once you’ve completed the main game, the “Restore” menu tells you the number of secrets on each level, making it a lot easier to find them. Hunting down your missing secrets on every floor is a nice way to look back at the whole game. I like to do it from the bottom up, as if returning from the journey Beethro hasn’t really finished yet.

Mastery gives you access to the “Dreamplane”, a sort of a museum of concept art and rejected room designs, which you explore in the same engine as the rest of the game. It’s impressively large, easily the largest level in the game, and I find it oddly engaging. Usually I’m not much interested in concept art galleries in games (unless the concepts are very different from the finished work), but piloting Beethro around the floors, looking for interactive bits but not really worrying about puzzles, is a relaxing end to a sometimes frustrating game. Moreover, there’s an element of the uncanny to it. See, the Dreamplane is physically accessible from the dungeon. There’s a stairway to it on level 13. You can’t explore beyond the entrance room until you achieve Mastery, but you can at least enter the level, which gives it something of an aura of in-fiction reality, despite being completely fourth-wall-breaking. Furthermore, getting past the Master Gate and into the rest of the Dreamplane effectively requires time travel. Now, when you jump around from level to level looking for secrets, you’re effectively rewinding time back to earlier points in your explorations, but this is non-diegetic time travel, more like turning back the pages of a book. The resulting Mastery doesn’t violate the narrative because even if you didn’t get all the secrets on your first pass, you theoretically could have done so. Getting past the entrance to the Dreamplane, on the other hand, isn’t theoretically possible within the narrative, because there are multiple points of no return between level 13 and level 25. Time travel isn’t necessary for Mastery, but it is necessary for getting back to that Gate once you have it. And once you have a physically real place that’s only accessible through metanarrative trickery, you have something very strange indeed.

JtRH: Courage

So, I fell out of the habit of blogging for a few weeks coinciding with a significant difficulty spike in Journey to Rooted Hold that led to me not playing it for a while. Level 24 is the last floor before the climax and finale, and several of its rooms strike me as tougher than the secret rooms and Challenges elsewhere. I’m talking puzzles that take me multiple sessions to complete. I don’t remember having quite such problems on my first pass at the game. Of course, that was years ago — long enough ago that it predates this blog, and this is a fairly elderly blog — so perhaps I did and just don’t remember.

Or perhaps my mindset is different. I’ve been having particular problems with puzzles requiring courage. Much of the time, the game rewards caution: hanging back in defensible places and waiting for the monsters to come to you, clearing sub-areas out completely before moving past them, and so forth. But there are a number of ways that this approach can be made to fail. Sometimes you need to get stuff done quickly, before a fuse burns down or the tar gets out of control. Sometimes the time pressure is subtle enough that it takes a while to figure this out. Maybe I was more willing to take the necessary risks before the Challenge scrolls forced patience into me.

Let me describe just one puzzle specifically for its irony. L24:2E, the room that I spent most of the last few weeks not solving. Part of my problem here was that I incorrectly believed that I had thoroughly explored the rest of the level. In fact there was a tiny green door I had neglected, which would have ultimately led to entering 2E from the west. Instead, I entered from the south, and judged the room’s contents accordingly. In the center of this room is a tar mother hemmed in by blue rattlesnakes, which are immobilized until you upset the equilibrium with your sword. Around the periphery is a layered lining. First, a moat of mud. Then a porous wall that squeezes the mud into monsters when the mother makes it try to grow through it. Finally, keeping the monsters bound, a serpent. The serpent’s head is trapped, which makes its tail shrink one tile every round. (This applies only to serpents proper; the rattlesnakes have different rules.) As it shrinks, it will let the mud monsters out, one by one.

Now, if you enter from the south, the serpent blocks your way. You have to wait through two complete spawn cycles for it to shrink enough for you to do anything about the mud babies it’s liberated, let alone make headway into improving your situation. If you enter from the west, you can go straight to work, but, in my ignorance, the only way I could see to enter from the west was to cross through the room and then re-enter it. This is doable, but it requires courage. My first efforts were aimed at making the crossing safe by slowly and steadily clearing tar, but the approach that works is to just make a dash for it before the serpent unravels all the way.

That should have been the end of the major problems, but I built a lovely little trap for myself in my mind. See, this room has a challenge scroll, and it’s one of those challenge scrolls that’s locked behind a green gate, where you only get access to it after clearing the room. But sometimes you can guess on the basis of a room’s contents what the challenge will be. Since entering the room from the west seemed to be one of the the puzzle’s lynchpins, it seemed likely that the Challenge was to not do that. And so even once I knew how to reach the western exit, I was reluctant to take it. I actually made pretty good progress towards clearing the room from the south, and came up with some clever ideas to help, but it was a long process, and the lack of checkpoints around the periphery meant that I essentially had to start over after every little mistake. Eventually I decided that it was taking so long that it would be worth the effort to actually do the room the normal way once just to check the scroll and make sure I wasn’t wasting my time. And… it turns out that I was. The actual challenge was to kill the tar mother before the first growth cycle. Something that was simply impossible from the south, and pretty tricky from the west, and absolutely required courage, in the form of sneaking through snakes.

At any rate, I’m through it all now, and in fact have reached the game’s end, although I’m not done yet, because I’m going for Mastery. I’ll talk about level 25 in the next post.

JtRH: Smart, but Not Smart Enough

And now I want to describe another hidden room with a Challenge. This one is on level 22, and my experience of it is pretty much the exact opposite of the one on level 20.

The theme of level 22 is something I mentioned recently: rooms that you can’t solve on first visit, although with an added emphasis on exposing the player to monsters on the first pass. Perhaps the pinnacle of this theme is 2N2W (that is, the room two rooms north and two rooms west of the entrance). This room has six blobby chambers arranged like flower petals, each containing at least two immobilized roach queens — enough to spawn roaches faster than Beethro can kill them — plus a passage on either side containing a Brain to make sure you can’t escape the roaches. As a hint to the player, Beethro says to Halph on initially entering the room from the south that he won’t be able to kill everything and that they should just get the doors to the west open and run for it. (This is most easily accomplished by just standing by the doors and fending off roaches while Halph runs around the other side of the room hitting the orbs that open them.) The western passage circles around through four other rooms and lets you re-enter the room from the north, where there’s a little isolated nook containing a fuse that ignites the bombs in the roach chambers.

I describe that room in particular because the hidden room I want to describe, 3N, is a variation on it. It lacks the bombs, but it also changes the walls and the roach placement in small ways that, per Beethro’s assessment, make the room solvable without them. The conventional solution starts the same as in the original version, escaping to the west. This just takes you to a dead end in a different room — a room, in fact, that you’ve already visited by this point. The visible but inaccessible dead end is a clue to the existence of the hidden room. The point of visiting the dead end is that the room resets when you re-enter it from the west, granting you enough time to kill the Brain in that passage and then dash over to the eastern passage to kill the other one before the room gets too roachlogged to make that run. You still have massive amounts of roaches to deal with afterward, and getting past the first two chambers is difficult and time-consuming. But at least you get to engage the roaches on your terms, once the Brains are gone.

The Challenge scroll for the room is in the dead end to the west, and the Challenge is to complete the room without using the dead end. This is honestly not much different than doing it the normal way. My solution: First I ran into the southeast lobe of the flower and killed the queens there. That took enough time for the roaches to get perilously close, so I retreated to the western passage and killed the Brain there. Getting from there to the eastern passage took some time, and judicious use of Halph. I had reduced the roach spawn count to 28 every 30 turns, so I basically got to move forward just two squares every 30-turn cycle. It wasn’t steady progress — turning the corner from south to east was tricky — but once I was in the eastern passage, it was basically the normal solution from there on. That is to say, the most difficult part of the puzzle was still ahead of me at that point, the part that dominates the experience of the room and which is completely unaffected by the Challenge.

The thing that really gets me, the reason I call it the opposite of that other Challenge, is that the Challenge solution is less clever than the normal solution. I mean, I’m not at all sure I would have thought of using the dead end if the Challenge scroll hadn’t told me not to. Sure, it fits the level’s theme better, but as it was, the only reason I went to the dead end before completing the room was that I wanted to read the Challenge scroll. The Steam Achievement for completing this Challenge is “Smart, but Not Smart Enough”. It could be describing me.

JtRH: Walk Through the Storm

Level 20 contains a Challenge that delighted me so much, I have to spoil it in detail.

To start with, it’s in a hidden room. Most DROD levels have a few rooms like this, reachable through hard-to-spot crumbly walls or subtler trickery. Such rooms are flagged as optional, so this is where the designers put the more difficult puzzles. In this particular room, the Slayer shows up briefly as an additional warning: all he does is say “Good luck” and leave, confident in his trap.

Stepping into the room means stepping on a fuse. The fuse automatically lights, then burns down one square per turn on a wiggly path until it hits a bomb, which detonates, along with every bomb caught in its blast radius, every bomb caught in the blast radius of those bombs, and so forth. This is a fairly common pattern in JtRH; it’s a way of forcing the player to make their way to a safe spot within a time limit. This room adds a strange extra step by having the detonations come in two waves. You’ll see a red wall around the area containing Beethro: a trap door gate, which lowers when all the trap doors in the room have dropped. The initial blast gets blocked by the gate, but it lights a second fuse that crosses the gate and detonates the bombs inside.

Now, opening the gate would sever that second fuse, so why don’t we do that? 1Correction: Opening a gate under a fuse does not sever it. Only closing the gate under it does so. So that’s another reason to not pursue this strategy. Also, on looking at it again, it looks like some of the bombs inside the gate are within the blast radius of the bombs outside, and only shielded from them by the gate. So there’s that too.
[Added 29 May] No, never mind, all the bombs inside the gate are out of reach of the initial explosion even if the gate is open. The explosion does reach the gate tiles, but no farther.
All you have to do is make one of the mimics in the upper chamber, which imitate your movements, step on the last trap door. That’s fairly easy. But if you try it, you’ll learn the reason: the entire area outside the gate is filled with spiders. The whole deal with spiders is that they’re invisible unless they move. Hiding crucial information like this is something of a violation of the spirit of the game as I understand it; presumably this is why spiders have been used so little after KDD. But they’re used here, and discovering them answers the question “Wait, I don’t see any monsters, so why are the green gates closed?” — something I didn’t even think to ask at first, so focused was I on obstacles rather than goals. (Mimics don’t count as monsters.)

The point is, letting the spiders out before the bombs kill them is disastrous. You can try to open the gate and kill them manually, but you’ll fail. So in searching for a safe spot to stand, you’re limited to the area inside the red gate. The only place inside the red gate that’s adequately shielded is inside the little crook in the upper left of the gate, and it’s blocked by both a green gate and a tar gate. So, that’s enough to give you goals! You have to get to the safe spot. On the way, you have to clear all the tar and mud, and kill all the monsters that spawn as a result of clearing all the tar and mud. You have to do this while keeping the mimics off that trap door and maneuvering around the bombs scattered around, which will blow if you accidentally stab them. And you have to do all this before the fuse burns down. This is not easy, but at root it’s just a matter of being careful and optimizing your movements, and that’s habit by this point in the game. The puzzle is essentially solved. You know what you need to do, and it’s pretty satisfying to finally do it.

On the way out of the room, you step on the Challenge scroll, which was inaccessible before. The challenge is: Don’t stab any tar. And it’s a beautiful moment, because it seems absolutely impossible.

It’s not just that it’s asking you to ignore a lynchpin of the puzzle. Lots of Challenges do that, and they don’t usually have the same impact. I think this is because most lynchpins aren’t quite as definite. Usually either you look at the puzzle and see a way to do it and it works, or you try it the wrong way a few times and can’t quite get it to work and start to think there must be a better way and look for one and find it. In the former case, the Challenge just tells you “Actually there’s another approach that would have worked too”. In the latter case, it tells you “The approach that you gave up on because it was too hard isn’t completely impossible”. But here? I didn’t merely notice a solution, I reasoned my way to one. Everything about it was a result of seemingly inviolable constraints. There is only one safe place to stand inside the red gate. To stand on it, you must clear all the tar. The only available means of clearing tar is stabbing it. And yet we are asked to not stab it. What this Challenge tells me is, “You think you understand this room. Actually, you do not understand it at all.” Solving it was a matter of re-examining my assumptions until I found one I could break.

References
1 Correction: Opening a gate under a fuse does not sever it. Only closing the gate under it does so. So that’s another reason to not pursue this strategy. Also, on looking at it again, it looks like some of the bombs inside the gate are within the blast radius of the bombs outside, and only shielded from them by the gate. So there’s that too.
[Added 29 May] No, never mind, all the bombs inside the gate are out of reach of the initial explosion even if the gate is open. The explosion does reach the gate tiles, but no farther.

JtRH: Goblin Territory

After hitting a rough patch in the mid-teen levels, I’m making progress at a pretty good clip again. I’m up to level 20 now, so Rooted Hold is basically within sight, or would be if we weren’t underground. But let’s go back a bit, to level 13, a goblin level, because that level has a pretty big gameplay shift. In the course of solving this level, you encounter the Goblin King, who’s kidnapped Halph and is holding him for ransom. The ransom is more than Beethro can afford, and ultimately the King admits that he knew this all along, that the ransom wasn’t the point. His real motivation is revenge for all the goblins killed by the Budkin family over the years and the ransom was just a way to make Beethro squirm. Beethro’s reaction is to charge into the goblins’ living areas and slaughter them all, much to Halph’s dismay — Halph, as established back when he was just one of many unnamed nephews in the outro to King Dugan’s Dungeon, thinks goblins are cool and is eager to make friends with them. And really, the goblins were never going to hurt him. Like all the dungeon’s monsters, they recognize that he’s special. But Beethro comes to his rescue anyway, regarding the goblins as creeps and his nephew as an idiot.

But he can’t do that right away. He passes through several roomsworth of goblins that are tantalizingly out of reach, while he’s isolated in a parallel passageway. And it all ends in the staircase down. Back when I played JtRH the first time, I wasted some time looking for the hidden passage or crumbly wall that would let me through to complete these unsolved rooms, but there was none. DROD is extremely friendly about letting you go back and solve things later, though. You can restore to any checkpoint in any room, and still keep the credit for everything you’ve solved, which is a good thing, because everyone misses most of the secret rooms on their initial descent. So I did eventually move on, and thus found that the levels actually double back after a while. You solve level 14, then on level 15 there’s a second staircase leading back up, which leads to another staircase to the area on level 13 that you couldn’t reach before. I said before that there are no stairs going back upward, that going down stairs just deposits you in a room without any stairs in it, and that’s true for KDD and the first half of JtRH. It stops being true here. Floors 13 through 15 aren’t just a sequence. They’re a space.

Now, most rooms in DROD are self-contained, but even KDD had some puzzles that span multiple rooms. Most obviously there was the infamous maze level, but there was also a sprinkling of things like rooms that you couldn’t solve when you entered them the first time, and instead have to cross to a different exit and then loop around and come back from another direction that you can solve it from. It seems to me that JtRH engages in this pattern a lot more than KDD did, and that the goblin subquest simply takes it to another level 1Literally.. This is a trend that The City Beneath will continue, as the rooms come to more and more represent places rather than just puzzles.

References
1 Literally.

JtRH: Enter the Mud

Level 14 of Journey to Rooted Hold is the first appearance of the Awakened Mud, which is sort of like inverse Living Tar. Where tar can be cut on its edges but not on its corners, mud can be cut on its corners but not on its edges. The result is that clearing mud is fundamentally simpler. Cutting away a corner generally creates a new corner adjacent to the old one, so in the absence of walls or other obstacles, you can clear any mudshape by shaving it away in layers. Thus, to avoid being trivial, mud puzzles tend to use walls or other obstacles.

When there’s something you need to reach in the middle of a large pool of tar — usually a Tar Mother — all you need to do is reach the pool’s edge and you can slice your way through the thick of it and straight to your objective. You can’t do that with mud. The only way get to the middle of a mud pool is by removing enough mud that it isn’t the middle any more. Relatedly, if tar growth leaves you completely surrounded, you can cut your way free, but in mud, you just get stuck, immobilized by stuff you can’t damage. In short, mud behaves very differently from tar, and has a very different effect on puzzles.

JtRH takes a clever approach to illustrating this. Level 14 is basically just a selection of tar puzzles from King Dugan’s Dungeon turned upside-down and with the tar changed to mud. I don’t remember this from the first time I played through JtRH. Maybe I noticed at the time and just forgot about it, or maybe I’m only noticing this time around because I played KDD so recently. Regardless, the impact of recognition here is the one good reason I’ve seen for playing KDD before JtRH. It must be very strange to see the mud versions of these rooms first, because the conversion leaves in elements that don’t make sense, design-wise. For example, there’s one room that, in its original form, has a door that’s opened by an orb that’s very difficult to reach, because it’s in a tar-filled area that’s only exposed at its corners. In the mud version, the orb is trivial to reach, but also kind of pointless, because both sides of the door are also trivial to reach.

What really tickles me is the way the game builds story around all this. Overheard conversations and discarded memos depict a feud between the Tar Technicians and the Mud Coordinators, the latter being a recently-formed group that’s regarded by the former as upstarts peddling an inferior imitation. And the Tar Technicians have a point. Mud is inferior to tar from pretty much every perspective. As a defense, it’s more easily defeated. Because it’s so easily cleared, it has less potential for interesting puzzle design. Because you have to peel it away in layers instead of just plowing through the middle, it’s more tedious for the player. The reuse of old tar puzzles doesn’t just illustrate the differences between the two substances, it reinforces the “inferior imitation” idea, as if the Mud Coordinators didn’t have any new ideas of their own. From one overheard conversation, we learn that the reason that the rooms of Level 14 are all upside-down from the originals is that the architect was holding the blueprint the wrong way up, further emphasizing the sense of incompetence.

This is stuff we didn’t see in KDD. When tar was first introduced, it was just a new puzzle element, one of those things you find in dungeons. In JtRH, new elements have stories associated with them, with characters and conflicts and meaning. And old elements gain these things retroactively.

JtRH: Tar and Parity

A couple of levels on, and I’m once again finding myself spending a lot of my time clearing tar, not just because of those tar gates, but because clearing a room completely of tar has become a fairly common subject for Challenge scrolls. The mechanics of it are seeping into my dreaming mind, occupying my idle thoughts. Let me get some of this out in words.

Tar lies in multi-square puddles, which you can cut with your sword along any edge, except at the corners, which are vulnerable only to explosions — which is to say, invulnerable in rooms without bombs, which is most rooms. To remain stable, the puddles have to have a width of at least 2 in all places, both north-south and east-west; any square of tar that lacks a neighbor in either dimension will break off and start chasing you. Thus, the smallest stable configuration of tar is a simple 2×2 square. Since this puts all four tiles at a corner, such a square cannot be cleared. It’s the basic kernel of most unclearable tar shapes: if you can clear everything except a 2×2 square, you were doomed from the start. There are other invulnerable shapes, but they basically amount to multiple 2×2 squares stuck together by shared corners.

The basic clearable tar shape, on the other hand, is the 2×3 rectangle. Poke that in one of its vulnerable longer sides, and the remaining five squares break into monsters. This can be generalized. Given a 2xn strip, the only things you can do are cut off two rows at one end, or remove one row in the middle and split it into two pieces. If n is odd, you can cut off two rows repeatedly until it’s 2×3. If n is even, then it will still be even if you cut off two rows, and splitting it in the middle will always create one strip with an odd length and one with an even length; thus, you’re always going to wind up cutting it down to a 2×2 square at the end. So strips of this sort are solvable if their length is odd and unsolvable if their length is even. Many rooms have a checkerboard pattern on the floor, allowing you to tell odd from even at a glance.

Similar logic, which I’ll leave as an exercise for the reader, shows that a rectangle is solvable if and only if it has at least one odd side. It’s basically a matter of parity, an odd-or-even property that you can’t change with your sword, except with “odd” and “even” confusingly swapped: an odd length represents even parity and vice versa. That is, by assigning “even” to odd lengths, an nxm rectangle has even parity if either n or m has even parity, just as the product of two integers is even if either of them is even. It works out this way because of how splitting a rectangle into two pieces requires removing a row. When you split a rectangle in two, the pieces will have similar parity if the original had even parity, and opposite parity if the original was odd.

At any rate, all rectangles with even parity are solvable, but things get more complicated when we move beyond rectangles. You can have lumpy shapes with corners in inconvenient places that keep you from making the cuts you want. If you can reduce a shape to two separate 2×2 squares, it had even parity, but might still have been unsolvable. Odd parity is always unsolvable, though, no matter the shape. Assuming that Challenges are never completely impossible, it’s therefore safe to assume that the parity of any completely inert tar pool you’re supposed to clear will be even. But if there’s a Tar Mother in the room, making the tar expand at regular intervals, it’s possible for the parity to change. Thus, when you kill the Mother, it’s imperative to make sure that the remaining tar has the right parity if you intend to clear it all. I have no better way to do this for wiggly shapes than to attempt to clear it and see if it I wind up with a 2×2 square left over. But if I do, at least I know better than to keep trying from the same point.

JtRH: Enter the Tar

JtRH Level 10 brings back the Living Tar, DROD‘s equivalent of slimes and oozes. Although not a new element in DROD, it was absent from JtRH until this point, and Beethro greets its reemergence with an “Oh no”. As well he should: it’s worse this time. One of the hard but useful lessons of the first game was that, although it’s often a good idea to clean up tar deposits completely (especially in the presence of a Tar Mother, which makes them grow and spread), it usually isn’t strictly necessary for the completion of a room, and in some rooms it’s actually impossible. Tar can spawn monsters — any tar that’s reduced to a width of 1 tile breaks off into a Tar Baby, which is functionally equivalent to a roach — but it doesn’t count as a monster itself in its senescent state, so a room can be full of tar and still count as conquered. (This has the peculiar effect that you can clear a room of monsters, and then, before you leave, cut into some leftover tar and spawn new babies, returning the room to
its unsolved state.) But JtRH adds a new element that changes this: Tar gates. Just as green gates open when there are no monsters in the room, and red gates open when all the trap doors in the room have dropped, the black tar gates open when all the tarstuff in the room is gone. 1To be more precise, these conditions don’t necessarily open the gates, but rather, toggle them. It’s just that gates usually start off closed. It’s possible to author a tar gate that starts open and closes when you clear the tar, but I haven’t seen this done in JtRH so far. So from here on out, clean-up-all-the-tar puzzles are a possibility. And that means it’s not only going to be necessary, it’s going to be difficult.

There’s one other thing JtRH adds to tar, though: context. Back in King Dugan’s Dungeon, tar was just one of those things you find in dungeons. There was no explanation for it. In JtRH, there’s… well, call it half an explanation for it. We know from notes found around the level that the the tar is artificial, concocted by the Tar Technicians of the Rooted Empire. What we don’t know is why. Very likely there is no real reason, or at least none that anyone remembers; I’ve commented before on how the Empire as a whole is an irrational system without a guiding purpose. Some of the notes we find describe experiments the technicians are doing on the tar, and the intro text for the level mentions “the crackpot theory that tar is in fact an artificial creation of a clandestine underground society whose scientific knowledge far exceeds our own” (emphasis mine). In short, this is the place where the game starts to suggest that this fantasy world may be a little sci-fi, possibly even futuristic.

The next level undercuts this severely by mentioning items of untold destructive power, which turn out to be round black ball bombs with long sparking fuses, an antiquated technology used today only by cartoon characters.

References
1 To be more precise, these conditions don’t necessarily open the gates, but rather, toggle them. It’s just that gates usually start off closed. It’s possible to author a tar gate that starts open and closes when you clear the tar, but I haven’t seen this done in JtRH so far.

Older Posts »