JtRH: Mastery
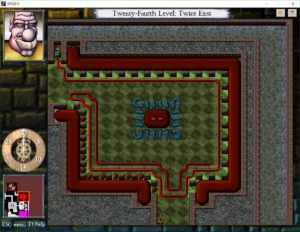
There’s a room pattern introduced back in level 16 of Journey to Rooted Hold, of rooms entirely filled with bombs except for a narrow and squiggly path. Accidentally nudging a bomb with your sword makes the entire roomful blow, emptying it in an instant. It’s the game’s strongest expression of overwhelming power, so of course the designers bring the pattern back when it’s time to kill the Slayer. The climactic one in level 25 is easier to navigate than the ones on level 16, though, which strikes me as a smart move. The main purpose of this room is story, not puzzle, and it wouldn’t serve the story to frustrate the player right on the verge of victory over the main antagonist.
In fact, that could apply to most of the level. Apart from the ending, level 25 is mostly about a new enemy, the red-uniformed “Guards of the Poppy Brigade”, brought in by the Slayer for a last-ditch holding effort. These guys are kind of like Slayers, but not as smart. Like the Slayer, they wield weapons, and they know how to navigate around walls (which makes them smarter than most monsters), but they’re vulnerable to some really basic swordfighting tricks. They like to keep their swords pointed toward Beethro even when that’s not the right thing to do, letting you kill them with maneuvers that they could have blocked if they knew the right dances. So they’re only dangerous when they mob you from multiple directions. The rooms do build up to that, but only after a whole bunch of easy tutorializing, and even when the puzzles get hard, the guards still kind of feel easy just because I’m mentally comparing them to the Slayer. Being mobbed just enhances that, because it’s an opportunity to kill them in droves.
Now, in that final Slayer room with all the bombs, there’s a moment of hypocrisy so pointed that it has to be deliberate. When Beethro lights the fuse, the exasperated Slayer complains that Beethro doesn’t know what he’s doing and that he’s putting “many thousands of innocent lives” in danger. And he has a point – Beethro really doesn’t know what the consequences of his delving will be, and we know from subsequent games that a whole lot of people, both surface-dwellers and citizens of the Empire, wind up getting killed. But anyway, Beethro retorts that the Slayer isn’t in a position to lecture Beethro about killing people. The Slayer starts to reply that Abovegrounders don’t count, but catches himself, apparently aware for once of what he’s saying. The thing is, at this point they both act as if Beethro has won the moral high ground, even though he’s just cut his way through a battalion of Poppy guards, treating them like they don’t count because they’re Belowgrounders. Really, it’s all just furthering the same who’s-really-the-monster stuff that got started when Halph befriended the roaches, or even earlier, with the Neather.
After that, it’s on to the sequel. Beethro swears to get to the bottom of this whole Empire business, which he eventually does, literally. But the player isn’t done with the game yet. There’s still Mastery. This means solving every single room, including the hidden ones — and some of them are hidden much more cleverly than I remembered. (Completing all the Challenges is not necessary for Mastery, in part because Mastery existed before Challenges.) As I’ve said, the game gives you a lot of help here. You can reload any room you’ve visited, and once you’ve completed the main game, the “Restore” menu tells you the number of secrets on each level, making it a lot easier to find them. Hunting down your missing secrets on every floor is a nice way to look back at the whole game. I like to do it from the bottom up, as if returning from the journey Beethro hasn’t really finished yet.
Mastery gives you access to the “Dreamplane”, a sort of a museum of concept art and rejected room designs, which you explore in the same engine as the rest of the game. It’s impressively large, easily the largest level in the game, and I find it oddly engaging. Usually I’m not much interested in concept art galleries in games (unless the concepts are very different from the finished work), but piloting Beethro around the floors, looking for interactive bits but not really worrying about puzzles, is a relaxing end to a sometimes frustrating game. Moreover, there’s an element of the uncanny to it. See, the Dreamplane is physically accessible from the dungeon. There’s a stairway to it on level 13. You can’t explore beyond the entrance room until you achieve Mastery, but you can at least enter the level, which gives it something of an aura of in-fiction reality, despite being completely fourth-wall-breaking. Furthermore, getting past the Master Gate and into the rest of the Dreamplane effectively requires time travel. Now, when you jump around from level to level looking for secrets, you’re effectively rewinding time back to earlier points in your explorations, but this is non-diegetic time travel, more like turning back the pages of a book. The resulting Mastery doesn’t violate the narrative because even if you didn’t get all the secrets on your first pass, you theoretically could have done so. Getting past the entrance to the Dreamplane, on the other hand, isn’t theoretically possible within the narrative, because there are multiple points of no return between level 13 and level 25. Time travel isn’t necessary for Mastery, but it is necessary for getting back to that Gate once you have it. And once you have a physically real place that’s only accessible through metanarrative trickery, you have something very strange indeed.
 Comments(4)