Archive for December, 2017

The Second Sky: Arky Rooms

I’m in a position in The Second Sky that’s more familiar from JRPGs than from puzzle games: very near the end, but holding off on completing the game because I want to finish more side-quests first. In a RPG, there are usually practical justifications for this: completing those last few quests could give you items or other boosts that help you against the final boss. At the very least, you can expect to get a little extra XP in their pursuit. That doesn’t apply to DROD puzzles. Neither will the bonus puzzles become unavailable after I win. Nonetheless, it is lodged in my brain that this is the proper order to do things in. Side-quests, then victory, and then, because this is DROD, going back to hunt for the secrets I missed and unlock the Mastery area.

One thing I discovered in my last session: a secondary office for the new First Archivist, who Beethro calls “Arky” to distinguish him from the First Archivist who attacked the surface, containing a note explaining his puzzle design MO. I should note that Beethro and Arky are reconciled now; towards the end of the story, Beethro finally gives him the apology that was all he wanted all along. Beethro’s really grown as a person over the course of this episode. But even after he’s your friend, there are still “Arky rooms” to contend with. The “Inventory” room back at the train hub even tracks them as a special category.

Arky rooms are always secret rooms, and thus optional. Their hallmark is a note from Arky describing what makes the room impossible to solve. An actually impossible room is trivial to make, but the point is that these rooms look like puzzles, and this tricks delvers into trying to solve them. In fact, the rooms are perfectly solvable, and Arky’s explanations of why they’re not contain hidden false assumptions. The effect is to make Arky seem humorously incompetent, and this is heightened by the way that the notes describing tricking delvers have been left around for delvers to find.

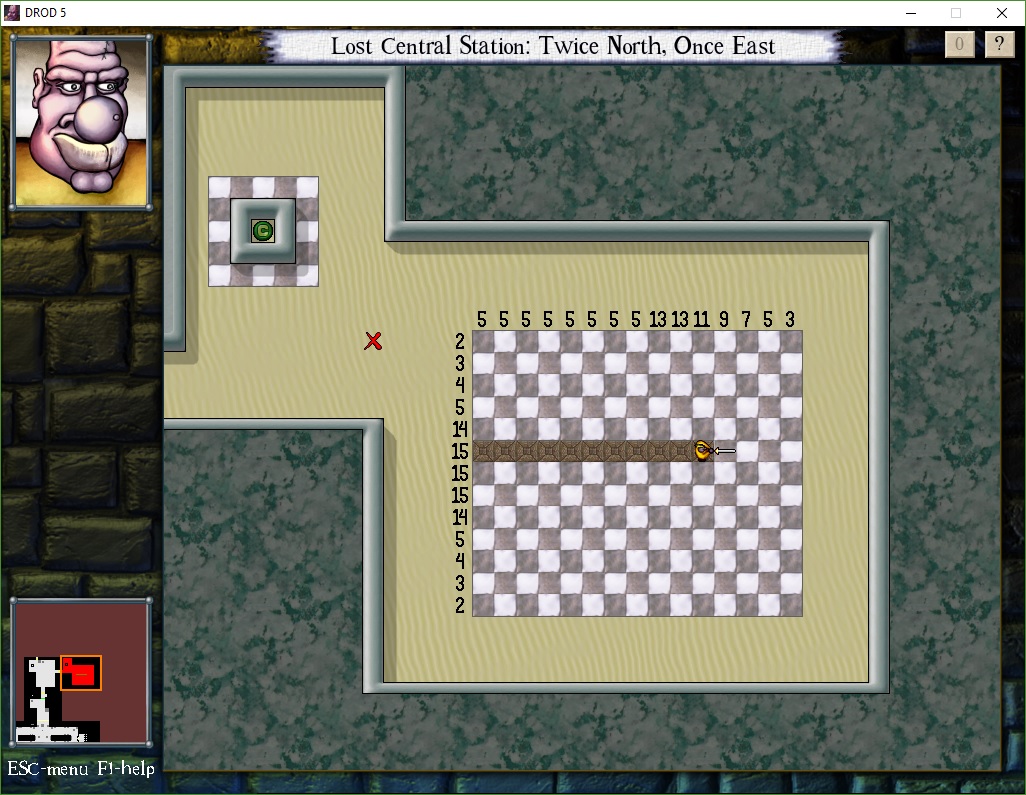
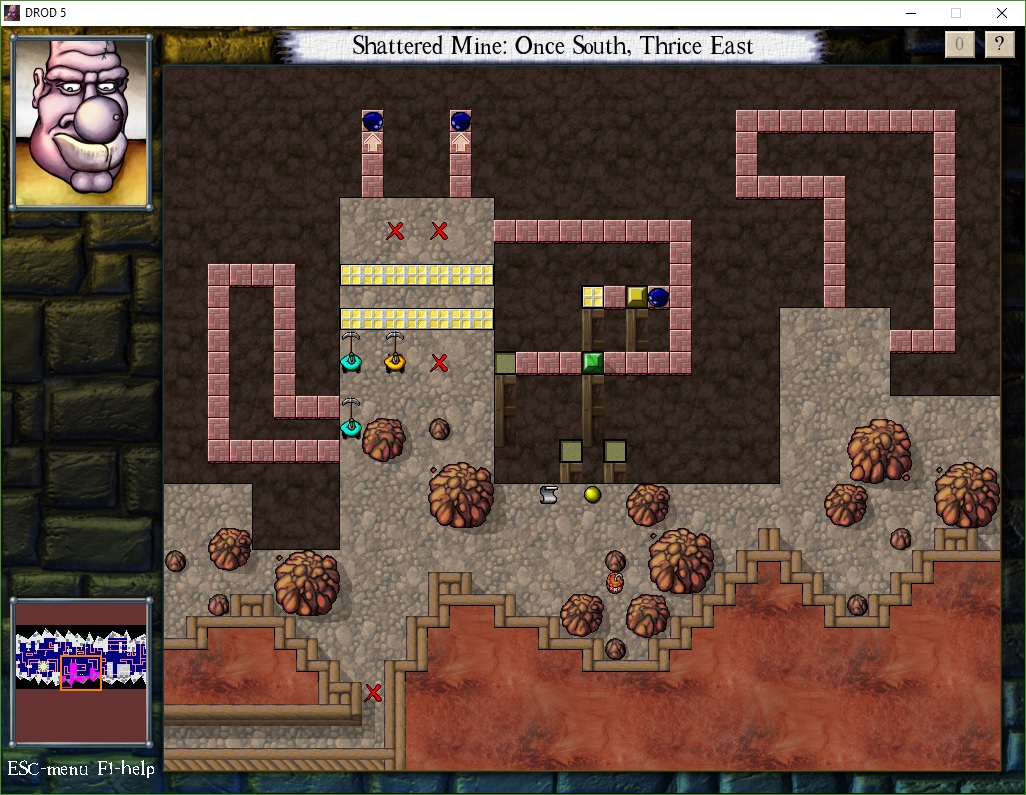
There’s one other purpose for the notes: misdirection. If it weren’t for the notes, the player might not notice that the room is “impossible”. There’s one note that describes how opening the room’s tar gate requires clearing three invulnerable 2×2 bocks of tarstuff with only one powder keg. I read that note on entering the room, and sure enough: the room has blocks of gel, tar, and mud. The sole powder keg could be placed between two of them, but had to miss the third. I assert that it is the effect of the note that it took me as long as I did to realize: Hey, wait a minute, a 2×2 block of mud isn’t invulnerable! I can clear that with my sword! It was like the room’s punch line. Arky seems all the more incompetent for making such a stupid mistake, but then, through the note, he managed to pass his stupidity on to me. Perhaps he’s cleverer than he seems?

The note in the secondary office says that the main trick behind his puzzles is to make ones that he personally can’t solve. If someone else finds a solution, he pretends that it’s what he had in mind all along. If no one finds a solution, it just makes him seem cleverer than everyone else. And it’s got me thinking: This actually might not be a bad approach for puzzle design in DROD. Obviously you want to not actually release puzzles that no one has been able to solve, but the “Let someone try to solve something I think is impossible” part? DROD players have proven their ability to find solutions that the designers didn’t think of. That’s how we got the kill-the-Slayer Achievement in Journey to Rooted Hold. Or consider taking the same approach with yourself as the player: design a puzzle, then remove something that the solution to the puzzle relies on and try to solve it anyway. I suspect that some similar process is behind all the theme-and-variations puzzle designs in this game. I mentioned a pair of levels called Easy Way and Hard Way. I have since discovered that it continues into Harder Way and Hardest Way, four sets of the same puzzle designs with the solution to each made impossible in the next.

The Second Sky: Railroading

One of the big surprises in The Second Sky is that the Empire has an underground rail system. It was built mainly to facilitate the collection of surface-dwellers, but Beethro can ride it. He doesn’t even have to trick anyone or sneak on board or anything like that. Because he still holds the position of First Slayer from back in The City Beneath, the Empire’s resources are at his disposal, to some extent, when they aren’t trying to kill him. Once again, it must be remembered that the Empire has no coherent system of policy, and Beethro can easily be considered an enemy of the state one moment and a VIP the next.

After a certain point in the story, after helping Tendry get into some trouble, Beethro flees the Patronage’s robots —

There are robots in this game. I haven’t mentioned them before, but I’ve been seeing a lot of them lately. The game calls them “constructs”, to fit them a little better into the basically-still-a-fantasy-despite-all-the-sci-fi-stuff setting, but they’re clearly robots. They’re a little like smarter versions of golems, in that they leave a pile of debris when killed, but with one major difference: until you clear the room, robot debris comes back to life every 30 turns. They remind me of the trolls in Nethack in that regard, and, like Nethack trolls, one way to keep them from reviving is to push them into a body of water with a pushing weapon. Another is to push them onto tiles infested with oremites, which they otherwise avoid. That’s a good example of how the game creates new exploitable complexity through special cases in combinations of elements, something that also reminds me of Nethack. There’s so much of this going on in the game that I don’t have time to describe it all in the kind of detail I gave to the earlier episodes.

Beethro flees the Patronage’s robots by getting on a train without an intended destination, just “Get me out of here”. He winds up at a forgotten station, which becomes a hub for side-quests. Once you have access to that, you can go anywhere in the world — okay, I talked about a world map before, but it turned out to be divided into sections, with only one section available at a time, and that limitation is gone. (Except that it won’t take me to the distant past, which is a bit of a shame, because I still have at least one unsolved puzzle back there. But we have the Restore menu for that.) In fact, the sections I passed through before seem to have sprouted some new levels, where I can go to solve bonus puzzles for collectibles, which are tracked at a special room in the train station. One of these collectibles: RCS tokens. I had found one of these earlier, before I had its context. “RCS” is the name of the train system, and what the tokens do is give you access to rooms containing nonogram puzzles laid out on the floor. Solve these, and your reward is more bonus levels.

I commented before about how each title in the DROD series does more with the bonus content than the last, and I was wondering how The Second Sky would manage to one-up Gunthro and the Epic Blunder, with its trail of clues leading to an entire extra level. It turns out that something like half the content of the game is extra levels this time.

The thing I really like about this is that it gives the game a sense of breadth. We’re not in a linear sequence of levels any more. We’re out exploring, pursuing whatever challenges we come across. It’s a design pattern I associate with JRPGs — most of the Final Fantasy games start off linear, but then you gain access to an airship and you’re suddenly free. I find it significant that the opening up of the DROD world is also accomplished by obtaining a vehicle, albeit one more suited to the largely subterranean setting.

The Second Sky: Major Spoilers

Welp, I’ve seen the secret at the heart of the world.

It’s one of those peculiar moments that calls the mindset of the whole game into question, like the end of Prince of Persia (2008), or confronting Gehn in Riven. As I anticipated, Beethro gets back to his own time just in time to stop Former First Architect from starting the Turning early. Beethro doesn’t even really have to do anything once he’s there; just showing up is enough to derail FFA’s plans. The thing is, though, this just stops the Turning from happening ahead of its proper time. Its proper time is 98 days from now.

I’ve mentioned before how Beethro is, at core, a seeker of knowledge, or at least of explanations. His chief motivation, from Journey to Rooted Hold onward, is a desire to find out what’s really going on. Heck, that’s why he went back underground in the first place: he just had to know what was beyond that unopenable door in King Dugan’s dungeon. The Second Sky has been surfacing this side of his personality even more than usual. And so it is that, on meeting the mythical being responsible for the Turning, a being made visually impressive simply by existing at a much larger scale than the rest of the world, his reaction is to ask a whole lot of questions. “Tell me about the Turning”, he insists, “I need to know!” And what he learns is that it’s inevitable. It’s not a product of villainy, not something he can fight or puzzle his way through. It’s just a part of how his world works, a pattern far older than his civilization, no more stoppable than the tides.

This makes Beethro contemplative. What do you do when you know your world is about to end? “I always assumed there’d be something useful to do”, he says. “Maybe all that’s left is to be ready for the worst.” For once, he doesn’t bother asking the Truth Vessel that stops by any more questions. It’s a sense of resignation you don’t often see in videogame heroes.

But he does at least decide to go consult the Patrons, on the basis that they seemed to be on his side before, and to have some kind of plan, and any plan is better than no plan. The player who’s been through all the DROD games and has seen a number of events from points of view other than Beethro’s has a better idea of what’s going on: the Patrons are already in the process of evacuating the surface. When this was revealed back in DROD RPG, I thought they were doing it to protect everyone from First Archivist’s army, but no, it’s always been about the Turning.

However, nothing can go smoothly in this world, due to either Beethro’s interference, or the Empire’s incompetence, or both at once. General confusion down below, helped along with suspicion about surface-dwellers, has resulted in the erection of defenses intended specifically to keep Beethro from returning to Rooted Hold. Meanwhile, Tendry from DROD RPG has a cameo in which he declares his intention to free his countrymen, who he still thinks of as prisoners rather than evacuees, and Beethro, not knowing any better than him, wishes him luck. Things are primed to go wrong in the grandest way. And once they do, Beethro will have something useful to do again: picking up the pieces, resolving the mess he helped to create.

The Second Sky: A Break in Tension

After sending you through the heart of the temporal storm, The Second Sky gives you a break. Beethro wakes up on a beach — something that the game makes a point of identifying as cliché — and we get the first puzzle-free wandering-around-talking-to-people segment in quite some time. It leads back into more puzzles, of course. A couple of the NPCs have fetch quests for you, sending you to puzzle dungeons on the periphery of the beach area. But it’s all a great deal less tense than the previous chapter.

I don’t think it’s less difficult than the previous chapter, though.

Partly it just feels less intense because of context and presentation. You’re not in a broken world on the verge of collapse any more. The art is a great deal gentler, almost pastel in its softness. I haven’t said much about the art in DROD before, but it’s gotten really good over the course of the series. The original DROD tiles were brutal and garish, and that art style is still available when it’s what the level designer wants, but now we’ve got excellent small-scale pixel art, delicately detailed, coupled with mood-setting lighting effects. Important objects, such as monsters, gates, bombs, etc. have a simpler and more stylized look than the backgrounds, with higher saturation colors, the better to stand out. Anyway, just the fact that the beach dungeons are well-lit makes a huge difference to the experience, letting you see all the detail clearly.

But there are also ways of varying the intensity of the puzzles that are orthogonal to the difficulty. Tense puzzles put you in danger. They send monsters after you, and arrange the terrain so you can’t just bottle them up with obstacles. They impose time limits. They put you in the position of continually reacting to things, and try to overwhelm you with urgency. This is why the Temporal Aumtlich was such a good foe for high-tension puzzles: by splitting, he easily adds new complications when you thought you had him under control. A relaxed puzzle is characterized by stability. Monsters tend to be immobilized, or at least locked away until you decide to let them out under your own terms. Rather than overwhelm you, they give you the time you need to prepare.

The difficulty in a tense puzzle comes from trying to avoid getting killed while accomplishing your goals. The difficulty in a relaxed puzzle comes from your goals appearing to be impossible. Sometimes a puzzle will be so stable that it’s hard to see how you can change things at all. By my earlier terminology, tense puzzles are tactical and relaxed puzzles are strategic.

The Second Sky: Temporal Aumtlich

In the classic Sega ninja arcade game Shinobi, the player can use a special “ninja magic” attack once per level, clearing the screen of enemies. Depending on the level, you get either a lightning storm, a whirlwind, or a “doppelganger” attack, in which duplicates of the player burst out from him and bounce around with a thundering noise. Despite being surrounded by other ninjas, the player character has exclusive access to these magics — until the final boss. He has all your spells, and uses them against you. Except, because the game is designed to be winnable, his versions are weaker than yours. His whirlwind attack is dodgeable. His lightning is localized. His doppelgangers emerge one at a time, and can be fought and overcome like any other ninja.

This was brought to mind by events in the swirling temporal maelstrom that Beethro finds himself in after jumping through a few time portals. It’s a place of chaos: precipices over a foggy void, lighting that’s dim and erratic enough that I can’t tell what color a gate is until there’s a flash of lightning, segments of floor that appear and disappear. The ever-useful clock in the UI doesn’t work properly here, sometimes moving backwards. This is the home of the Temporal Aumtlich.

In a sense, there’s only one Temporal Aumtlich, but you have to kill him over and over. That’s because he’s capable of spawning time-clones of himself — just like Beethro does when he steps on a temporal split token. This comes on the heels of several levels all about time-cloning puzzles, so this is one of those Shinobi moments, where you encounter an enemy with powers similar to yours, and it somehow doesn’t seem fair. Time-cloning is a very powerful tool, even if the puzzles are set up to make it difficult to apply correctly, and now that tool is being used against you. And unlike the Master Ninja’s knock-offs, the Temporal Aumtlich’s version is better than yours. Unlike Beethro, killing one branch doesn’t kill the others. Also, he doesn’t need a time split token; his power is intrinsic, and he can apply it anywhere, as many times as he likes, turning himself into an army.

In practice, though, his splits are predictable, linked to his movement, which is as controllable as that of any other monster. What he does is: Whenever he has a choice of two equally-direct paths towards you, he takes both. It reminds me a little of a non-deterministic Turing machine, an abstraction used in theoretical computer science that’s sometimes described as a computer that’s capable of splitting into two identical computers so it can explore two execution paths simultaneously. But the branches of a non-deterministic Turing machines aren’t capable of getting in each others’ way like the Temporal Aumtlich does.

So this is a tense set of puzzles, based around a problem that can keep getting worse, but it’s nonetheless something that you can learn to manage. Some of the more difficult puzzles actually require you to deliberately spawn new Temporal Aumtlich instances under your control.

The Second Sky: Time Mastery

Another level of those Braid-style cooperate-with-your-past-self puzzles. Let me say a little more about how this mechanism affects and is affected by DROD.

This type of puzzle is fundamentally about executing a plan without being able to see its effects. In the simplest cases, you go forth from the temporal split point and do things that will benefit you after you rewind, like standing on pressure plates to open doors for your future self to go through, taking care to anticipate how long you’ll need to stand on each plate. But your future self can do things that affect your past self, too. Suppose there’s a pressure plate that opens a door, and on the other side of that door there’s an orb that releases a dungeon roach near the pressure plate. If it kills your past self standing on the plate, you die. So your past self has to be prepared to deal with that roach, even though it can only play back a repeat of recorded actions. When you set out from the temporal split point the first time, you wave your sword in the air in the place where you know the roach will be. The actions will remain the same, but circumstances will change their meaning. This is a rich ground for puzzles.

Now, roaches are simple and predictable, and easy to plan for. But there are monsters that run on subtler and more complicated algorithms, like serpents and goblins and soldiers. My usual approach when fighting these things is to take it a turn at a time and undo a lot. I don’t have a perfect model of their behavior in my head, so I have to keep correcting my course. Temporal split tokens can make this habit unworkable. You can’t take things a turn at a time when you have to do everything in advance. Thus, puzzles using temporal split tokens have the potential to require complete mastery of the game’s increasingly complex systems in a way that other puzzles don’t.

Mercifully, the game so far hasn’t much explored this potential. I’ve seen one puzzle that pits you against future goblins, but that was in a secret room, which means it’s allowed to be unusually hard.

The Second Sky: Stuck in Time

My earlier speculation is coming true: time travel and time-rewinding powers are becoming a more and more prominent part of both puzzle and plot. There’s an entire level, the Chronometric Sanctum, based around the same sort of accretive time-rewinding single-player-co-op puzzles as that one level of Braid, or P. B. Winterbottom, or Cursor x 10. Or a lot of other imitators. But never mind that it’s been done before. Combining it with DROD gameplay makes it new. One room uses trap doors to recreate the famous Seven Bridges of Königsberg problem, impossible in real life, easy when you have the help of your past self.

I say “an entire level”, but it’s really two levels: the same location in two time periods, which you can travel between via a larger version of the time-rewind tokens you use within the puzzles. There are rooms you can reach in both time periods, but they’re pristine and new in one period and overgrown ruins in the other, with crumbling walls and collapsed walkways and rusted-shut doors. I guess it’s an application of the King Dugan’s Dungeon Floor 6 pattern, reusing layouts while completely changing the puzzles.

I spent more time than I would have liked stuck here, and stuck in a way that’s unusual for DROD. I had cleared all the rooms on the level, but there didn’t seem to be a way forward. I just didn’t know where to go or what to do. I couldn’t even escape the way I came — as in the mines, the entrance seals behind you. The secret turned out to be that one room has a pressure plate hidden under one of the temporal split tokens. It’s a room where you don’t actually have to use the token otherwise, but it makes sense that it’s there anyway because it’s part of the puzzle in the room’s other version, in the other time period. The game UI helps you find the triggers for each door by highlighting them when you click on the door, but usually I use that to answer the question “Which of the various orbs and pressure plates I can see on this level controls the door?”. This is the first time I can think of that I needed to click on a door to see the controls at all.

After completing this section, the game starts linking levels together with time portals in the form of swirling vortices in the air. The first such portal sends you to the distant past, separating you from everyone and everything you’ve become familiar with through the story so far — except for the Critic, who still inexplicably manages to find you anyway.

In the wilderness that follows, you’re switched to another new weapon, the dagger. Like the spear, the dagger is a poking weapon. Unlike the spear, you can’t push things laterally with it. It doesn’t block monsters moving into its space, with the result that you can sometimes kill two in one blow: the one in the space it’s in, and the one in the space it moves to. But the most important thing about the dagger is that it lets you move like you’re unarmed. Moving in any direction automatically pivots you to face that way, whether you want to or not. This takes some getting used to, and reduces your capabilities somewhat. For example, it makes it impossible to push powder kegs around: pushing a thing means moving towards it, which automatically makes you face it, and moving towards a keg dagger-first means attacking it, which makes it explode.

The level that introduces the dagger does a peculiar thing: it contains features that are clearly meant for someone with a different weapon. One room has a red gate, which only opens when you’ve dropped all the trap doors in the room, but, just like when you’re unarmed, you don’t weigh enough to drop trap doors when you’re using the dagger. Another has a fuse and a set of powder kegs that could be pushed into a position to blast through a wall, if you could push them. It’s possible that this is just more trolling, but I suspect that this will all lead to revisiting the same rooms with a sword later, similar to the Chronometric Sanctum. Even before the time-travel stuff, there were some paired levels like that: The Easy Way and The Hard Way consisted of two versions of the same set of rooms.

I say that having gotten through the level. While getting through it, it seemed more likely that I’d get my sword back before leaving. Partly that’s because the very last room in the level has a very clear sword-only solution, and seems impossible with a dagger. It contains a small room filled with monsters on a ring of force arrows, isolated from where you can go. A potion nearby lets you drop a mimic inside the ring, where it could spin in place and kill everything if it had a weapon with an edge. It took me a good long time to figure that one out — it relies on a specific edge case in how mimics with daggers work. And, as in the Sanctum, I spent much of that time just wandering around the level, looking for I know not what.

The Second Sky: Jumping Three

Still in that mine. I’ll probably move on tonight, just to start making progress again, but it’s a little galling to leave with just one puzzle left undone. It’s a doozy of a puzzle, at least. Just as seemingly-impossible as killing the Slayer in Journey to Rooted Hold. I mentioned in my last post how you can use a mimic with a pickaxe to move two spaces on one turn. This puzzle comes down to using two mimics with pickaxes to move three spaces.

I won’t post a screenshot of the room here, because I’ve already posted one. The central problem here is that you need to get through two rows of pressure plates to reach the monsters. The first row opens a door on the right that lets a monster onto another pressure plate that makes it impossible to finish the puzzle. The second row of pressure plates closes that door, but if you just walk from one plate to another, it’ll be too late. The monster will already be through the door. The only way to keep it from getting through is to close the door on the same turn that you open it. That means walking three squares north in one go.

Now, the obvious approach is to take the solution for moving two spaces with one mimic and iterate it: you move forward, the mimic behind you moves forward and gives you a push, the mimic behind it moves forward and gives the first mimic a push which causes it to push you again. (It must be noted pushing a mimic stuns it for that turn, preventing it from moving under its own power. So the movement sequence has to go from front to back, and that means that Beethro, who initiates the movement, has to go in front.) But there are complications. Mainly, that the two-step solution requires a trick that isn’t easily chained. A mimic tries to move exactly like you, and that means preserving its distance from you. You can’t push something while preserving your distance to it; that’s following, not pushing. So you have to trick the mimic into moving closer to you by exploiting obstacles that keep it from imitating your moves exactly. If you move northwest, and the mimic can’t move northwest because there’s a pit there, it’ll move straight north instead. This can push you, if you started in the right place. But the second mimic can’t pull the same trick on the first. If it’s directly behind the first, so that it also moves north, it’ll just preserve its distance. If it’s to the southeast, it’ll try to push the first mimic northwest, which might wind up pushing it north instead if the obstacle to the northwest is solid. But in this puzzle, it’ll just successfully push it northwest into the pit.

There’s one technique I’ve found that gets around this partially. I call it spring-loading. If mimic A tries to push mimic B north, and there’s a solid obstacle directly north of mimic B, then B cannot be pushed and it’ll wind up occupying the same space as A’s pickaxe. (Weapons occupying filled spaces is not unusual; Beethro has always been able to swing his sword into walls.) They are now in a configuration that lets mimic B move north two squares: B moves north, winding up directly in front of A’s pickaxe, then A pushes B north. Of course, in order to actually do this, the obstacle to the north has to go away. But we have one movable object that counts as a solid obstacle: Beethro, as long as you’re not moving weapon-first. The problem then becomes that we need Beethro to be an obstacle one turn and then push him with a pickaxe the next.

However, with the right placement, this is doable! And I have in fact successfully used spring-loading to move Beethro three squares at a time. The only problem is that I can only do it in a place where there are obstacles to both the left and right, and that’s a condition that only exists too far from the pressure plates to do any good. I suspect that the solution involves somehow using those obstacles at the back end of your chain and extending your reach a little by pushing the room’s lone powder keg ahead of you, like the puck in a game of recursive hockey.

Anyway, the important thing is that I’ve written all that down, and thus feel like I can move ahead without losing my progress toward figuring it out.

The Second Sky: Secrets of the Shattered Mine

I’m still in that mine, but at least my lack of progress is once again elective. I’ve opened the exit, but I’m hanging back to figure out the level’s two Secret Rooms.

They’re hardly Secret at all, really. The level has an obvious structure, two rows of rooms on either side of large chasm with a circuitous network of rickety walkways over it. Any room-sized gap in those rows begs to be filled. On top of that, you can in a sense visit the Secret Rooms early, via passages that loop back into isolated pockets that let you look at the puzzle content without being able to reach it. Where other levels hide their secrets, this one throws them at you as a dare. This may have something to do with my insistence on completing them before moving on.

These Secret Rooms aren’t just sealed behind a crumbly wall in the hope that you won’t notice them. Their entrances are guarded by secondary puzzles in other rooms, requiring you to solve the room again in a harder way. The presence of these antechamber puzzles is obvious, marked by an opposed pair of room-clear gates acting as a sort of airlock. If you can solve this puzzle, it gives you extra motivation to solve the puzzle beyond it. If you can’t, you have no business attempting it yet.

The level’s puzzle theme has three elements. First, the pickaxe, a new weapon that’s basically the dual of the spear: sharp sides and a blunt tip, so it kills when it swings and pushes when it pokes. Then there’s the powder kegs, which are small bombs that you can push around. (It’s good to finally have another pushable item, by the way. The City Beneath had pushable mirrors, and it always seemed a little weird that mirrors were the only things you could push, because it meant it often didn’t really matter that they were mirrors. Whenever the level designers needed an object to weigh down a pressure plate, they used a mirror, because that’s what was available to them.) Finally, there are mimics, which imitate your movements. Mimics aren’t new, but they’re thrown in because they interact with pickaxes and powder kegs in unintuitive ways. For example, if you arrange things right, a mimic with a pickaxe can push you, allowing you to move two squares on a single turn.

A pickaxe enhances your pushing ability a little, letting you stand oblique to the push direction, but not nearly as much as the stick or the spear, which let you push laterally or even angularly. Here, you can only push from behind. Most of the rooms here have random decorative powder kegs stacked in corners and crannies where they’re unpushable and the only way to interact with them is by accidentally blowing them up. Occasionally, though, one will be placed in a way that you can get behind diagonally. Maybe it’s not easy to get there. Maybe you have to do something tricky involving a mimic first. But once you do, you have an extra tool for solving the room, one that wasn’t obvious at first glance. It strikes me that the use of irregular jagged-walls-and-random-boulders terrain is similar: any bump or protrusion might be the crucial thing you need to catch a mimic against to make it move the way you want, and the fact that there are such irregularities all over the place means it’s not obvious which ones are important. The reason that the level can get away with so much obviousness in its secrets is that it’s sneaky at a lower level. This contrasts greatly with the Tar Recycling Annex, which kept things highly regular in order to keep the player’s attention where it needed to be.

The Second Sky: Progressively Greater Stuck

I spent most of the time since my last post semi-stuck — “semi” because I had the option of unsticking myself at any time. There was an obvious path forward, and I wasn’t taking it. You know how there are extra-hard secret rooms? I had found an entire secret level, an extravagance that DROD generally saves for after Mastery.

Named “Tar Recycling Annex”, it was all about the way tar interacts with spike traps, which destroy it by the same rules as your sword. As a well-regulated imperial sub-system, there’s a uniformity to the rooms here. In every room, there’s a tar/spike chamber with a walkway around it, gated by pressure plates, and you have to get the tar to weigh down the right pressure plates for long enough to let you walk all the way around the walkway and reach a conquest token.

Conquest tokens have been part of the DROD for a few episodes now, but it seems to me that The Second Sky uses them more extensively than prior games. The idea is that they add an extra requirement to a puzzle: in addition to slaying all the monsters, you also have to step on the conquest tokens. There have even been puzzles with just the tokens and no monsters. Now, for most puzzle designs, they’re not absolutely necessary. If you want the player to go to a particular spot, you can put a roach in a corner and immobilize it with a force arrow, or put an orb there that opens the exit door, or various other tricks familiar to the experienced DROD player. The choice to use conquest tokens here is purely an aesthetic and thematic one. The feel of these rooms is stable, controlled, and mechanized. That means no extraneous monsters and no human conveniences.

Anyway, these rooms are hard. And there’s even a harder variant of one of the harder ones in a secret room. If I were still doing replays, I’d probably still be stubbornly refusing to move on, but since there’s still so much of the game I haven’t seen yet, I ditched with only half the level completed, something I don’t usually do in DROD because DROD doesn’t usually give you opportunities to do it. But The Second Sky encourages the player to skip around from level to level more than usual. Sure, there’s always been the Restore menu, letting you go back to any checkpoint you’ve hit, but now there’s also a world map, accessible whenever you exit a level, that makes it easy to revisit levels without losing state. So I was confident that I’d be able to go back and try to recycle more tar whenever I wanted.

What followed was a rather impressive bit of trollery on the part of the developers. Spoilers follow.

For most of the game to this point, there’s been a countdown to the Turning. It starts at over 200 days, and ticks down several days every time Beethro has to travel a significant distance. When I entered the Tar Recycling Annex, the countdown was at 98 days. But the moment I decided to start advancing the plot again, the Genocidal Madman Formerly Known as First Archivist managed to find a control room that let him accelerate the schedule. The world is basically destroyed, the map is wiped, and Beethro is stuck in an abandoned mine. And when I say “stuck”, I mean he can’t even leave the way he came. The only way out is forward, through more difficult puzzles.

It took me a while to realize just how inaccessible the previous levels had become. I can still go back via the Restore menu, of course, but I still hold some hope that I’ll be able to make the Turning unhappen and handle unfinished business diegetically. That’s because of the time beacons. The game has not only introduced a mechanism for rewinding time (in a small, local way), it’s made a point of discussing it in a cutscene, making it a part of the plot. That has to be leading somewhere.

Older Posts »