Gemcraft: The Shadows I’m Apparently Chasing

I mentioned before that there’s a type of randomly-appearing monster in Gemcraft: Chasing Shadows called a Shadow, described as an “avatar of the Forgotten”. A bigger Shadow was also the final boss in the previous game, Gemcraft: Labyrinth; the smaller Shadows have fewer hit points but are otherwise basically unchanged from the original. (It reminds me a little of beating the Slayer at the end of DROD: Journey to Rooted Hold and then facing “Slayer trainees” in its sequel.) Shadows have by far the most complex behavior of any enemy type in the game. They drift around the battlefield, ignoring the path and all obstacles, constantly increasing their armor as they go, occasionally pausing to execute one of their various abilities: spawning spawnlings, firing projectiles at your base, buffing other monsters, healing, turning temporarily invulnerable — each power accompanied by morphing into a different shape. And it all seems a bit of a waste, because by the time you start encountering them, you can pretty much one-shot them. There’s a Vision level or two where you have to defeat Shadows without your skill upgrades, and that’s pretty much the only opportunity to have a real shadow fight.

There’s one particularly notable thing about shadows, though: they’re capable of moving while the game is paused. They’re greatly slowed down, but not immobile like most things. This is the sort of real-time game where you can keep on interacting with the UI while it’s paused, and I frequently do — most of the time, when I want to effect any change on the battlefield, I pause the game while doing it, so that the time spent just moving my mouse around won’t count against me. So it’s really fairly alarming to realize that it doesn’t quite work on everything.

I kind of suspect that this behavior was originally a bug. It’s the sort of thing that would happen if, say, they keep Shadows from colliding with things by putting them on the UI layer, and then can’t completely stop the UI layer and still have it interactive, so instead they just give it a very small but positive time scale. I have no idea if that explanation is at all close to how it happened, but it’s the general sort of thing I expect. Regardless, even if it was a bug at some point, the designers definitely embraced it, as reflecting the sort-of-fourth-wall-breaking nature of the Forgotten, whose avatar the Shadows are. This is an important part of game design: When things don’t behave the way you want, a good designer asks “Is this better or worse than the intended behavior?”

The Second Sky: Secrets of the Shattered Mine

I’m still in that mine, but at least my lack of progress is once again elective. I’ve opened the exit, but I’m hanging back to figure out the level’s two Secret Rooms.

They’re hardly Secret at all, really. The level has an obvious structure, two rows of rooms on either side of large chasm with a circuitous network of rickety walkways over it. Any room-sized gap in those rows begs to be filled. On top of that, you can in a sense visit the Secret Rooms early, via passages that loop back into isolated pockets that let you look at the puzzle content without being able to reach it. Where other levels hide their secrets, this one throws them at you as a dare. This may have something to do with my insistence on completing them before moving on.

These Secret Rooms aren’t just sealed behind a crumbly wall in the hope that you won’t notice them. Their entrances are guarded by secondary puzzles in other rooms, requiring you to solve the room again in a harder way. The presence of these antechamber puzzles is obvious, marked by an opposed pair of room-clear gates acting as a sort of airlock. If you can solve this puzzle, it gives you extra motivation to solve the puzzle beyond it. If you can’t, you have no business attempting it yet.

The level’s puzzle theme has three elements. First, the pickaxe, a new weapon that’s basically the dual of the spear: sharp sides and a blunt tip, so it kills when it swings and pushes when it pokes. Then there’s the powder kegs, which are small bombs that you can push around. (It’s good to finally have another pushable item, by the way. The City Beneath had pushable mirrors, and it always seemed a little weird that mirrors were the only things you could push, because it meant it often didn’t really matter that they were mirrors. Whenever the level designers needed an object to weigh down a pressure plate, they used a mirror, because that’s what was available to them.) Finally, there are mimics, which imitate your movements. Mimics aren’t new, but they’re thrown in because they interact with pickaxes and powder kegs in unintuitive ways. For example, if you arrange things right, a mimic with a pickaxe can push you, allowing you to move two squares on a single turn.

A pickaxe enhances your pushing ability a little, letting you stand oblique to the push direction, but not nearly as much as the stick or the spear, which let you push laterally or even angularly. Here, you can only push from behind. Most of the rooms here have random decorative powder kegs stacked in corners and crannies where they’re unpushable and the only way to interact with them is by accidentally blowing them up. Occasionally, though, one will be placed in a way that you can get behind diagonally. Maybe it’s not easy to get there. Maybe you have to do something tricky involving a mimic first. But once you do, you have an extra tool for solving the room, one that wasn’t obvious at first glance. It strikes me that the use of irregular jagged-walls-and-random-boulders terrain is similar: any bump or protrusion might be the crucial thing you need to catch a mimic against to make it move the way you want, and the fact that there are such irregularities all over the place means it’s not obvious which ones are important. The reason that the level can get away with so much obviousness in its secrets is that it’s sneaky at a lower level. This contrasts greatly with the Tar Recycling Annex, which kept things highly regular in order to keep the player’s attention where it needed to be.

The Second Sky: Weapons

We do of course get a steady diet of new monsters and terrain features as the game goes on. Notable additions include spike traps that spring up and kill things every ten turns, temporal beacons that let you deliberately return rooms to their unsolved state to enable elaborate Room Clear/Level Clear gate shenanigans, and Fluff, a sort of aerial tarstuff with enough novel properties to fill a blog post of its own. But there’s one addition that has me particularly interested, because it’s a completely new category of thing for the designers to experiment with: weapons.

In a sense, this isn’t entirely new. The City Beneath gave us one other alternate weapon, that being the null weapon, the state of being weaponless. Also, the idea was played with a bit in Wonderquest, the one game I know of that outright imitates DROD‘s mechanics. Wonderquest had this notion that you were playing as a party of multiple characters with different abilities, and some of those characters had different weapons; I remember in particular one that had a staff that extended in two opposite directions. You only had one character in play at a time, though, and switched among them by stepping on tokens on the floor. It mainly used this to limit access to characters, making the ones you needed difficult to access.

DROD‘s weapon-switching is also based around stepping on tokens, but so far, it’s mainly used this to force you to switch to weapons you don’t want, ones that are less powerful than the default Really Big Sword. The first alternative you get is a mere wooden stick, incapable of killing anything directly. Hitting something with a stick briefly stuns it, and pushes it to an adjacent space if there’s room. Mind you, this can be enough to kill things. Just push it off a cliff, or into a hazard like a spike trap. And the ability to push monsters around isn’t nothing. There are loads of puzzles throughout the DROD series about getting monsters to go where they’re useful to you, and previously, the only way to do this was to make them chase you there.

The second weapon you get is a spear. This is capable of killing things, but only with poking movements. Hit a monster with the side and it just acts like a stick. In a way, this seems like the best of both worlds, because you can both kill and push with it. But so much of my monster-slaying technique relies on swings and side-steps and back-swipes that you can only do with the sword. Killing with a spear is just a great deal less efficient. If you want to stand your ground, you have to keep backing up to do it.

That’s all I’ve found. I expect there will be more, maybe even the long-anticipated ray gun. That’s an old in-joke from the Caravel forums — the ray gun is the canonical example of a player’s request for a feature that would ruin the game by making it too easy. But I trust that the designers would find ways of making a ray gun into a liability.

After all, they’ve found ways to make the obviously inferior weapons better than your sword.

It all comes down to the immense variety of game elements and how they interact. Some monsters, like Gentryii or Wubbas, are invulnerable to damage. If you hit them with your sword, it just does nothing. If you hit them with a stick, it pushes them just like it pushes anything else. So the stick is a better choice than the sword against them. And as for the spear, I’ve recently discovered that it has a secret virtue: it can damage tarstuff at any point, without regard to edge or corner. These things aren’t inferior. They’re specialized.

TCB: Story Challenges

Once again, I’m going for Mastery: finding and beating all the secret rooms and unlocking the Master Gate and its hidden concept art gallery. Usually I manage this in a single manic session, sometimes the same session where I complete the game. But somehow, it’s been taking me longer this time around, despite having done it once already, years ago. Maybe I was better about locating secrets on the way down, back then, so that I had fewer to handle afterward. As I write this, I have four secret rooms remaining. Two of them, I’ve found but not solved. The other two I haven’t even found.

In addition, there are still several Challenges in the in-game Challenge list (and a Steam Achievement with each one). I’ve been taking care to do the Challenge scrolls as I find them, but this game has, for the first time in the series, Challenges that don’t have scrolls. Yes, even the “Kill the Slayer earlier than you’re supposed to” challenge in Journey to Rooted Hold had a scroll, locked away behind a Master gate on the level where the Slayer first appeared. But here in The City Beneath, there are Challenges of a different sort: ones linked to story content rather than puzzles. Whenever there’s an optional cutscene that plays only when you do something special, like going back and talking to someone in the city after a plot event relevant to that person happens, there’s a Challenge for doing it. I intend to do all of these Challenges, but some of them are time-consuming. One requires you to kill the Guide that the Negotiator assigns to you in the beginning, then play until you get a cutscene where two people discuss the Guide’s murder. To get this, I had to play through two entire levels a second time, just to get from the murder opportunity to the cutscene. I guess the game hints at this when Beethro says he’s tempted to kill the Guide, but as a player, I wasn’t tempted at all. I liked the Guide. She gave Beethro sass.

TCB: Halph

Looking over my ten-year-old posts on The City Beneath, I’m surprised at some things I didn’t describe. I suppose I was avoiding spoilers at the time. Well, there’s less point in avoiding spoilers when the final revelation of this episode is given away by a subsequent episode’s title and cover art. So let’s talk about Halph.

I’ve mentioned how Journey to Rooted Hold hints at Halph becoming like the Neather. In TCB, this gets even more pointed. In the year between episodes that Beethro spent journeying beneath, Halph fell in with the Dungeon Architects. He’s happily assimilated into the Empire, and regards Beethro as his enemy, with all the fervor of a rebellious adolescent who’s found new friends that his family doesn’t like. And so he appears as the end boss of TCB, in a cycle of rooms organized much like the Neather’s lair, overseeing the puzzles from control chambers that you can’t reach until you’ve solved it all. The one big difference is that instead of just opening and closing doors to control the flow of monsters, Halph commands an army of Builders, who alter the contents of the dungeon at his command, erecting or tearing down walls, bridging chasms, removing the supports from bridges, and so forth. The puzzles here are about trying to control the Builders yourself — for example, by blocking off certain construction areas with monsters, forcing the Builders to work on something else. I feel like there’s a lot of potential that the level only begins to explore. More importantly, though, it puts Halph into the role of game designer even more clearly than the Neather ever was. The Neather had a role in executing puzzles, but Halph is involved in actually constructing them. And, as with the Neather, defeating Halph means breaking into his dev-only area, behind his freshly-built walls.

Not because you want to kill Halph, though. Beethro would be fine without this conflict. He just wants to get to the bottom of things, by literally getting to the bottom of things. But Halph is in his way, refusing to let him see what’s at Lowest Point. Why? Not because Halph knows what Beethro will find, but specifically because he does not. He doesn’t want to learn anything that might challenge his new-found faith. Beethro, for his part, freely calls him out on this, annoying him no end. It’s a lovely dynamic for a boss fight: villain as petulant child, hero as irritating uncle who knows how to push his buttons.

TCB: A Puzzling Puzzle

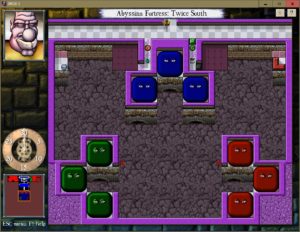
I reached the end of The City Beneath over the weekend — it’s definitely a much easier game than Journey to Rooted Hold. But before talking about that, I’d like to describe a room in the final descent that left me baffled, even after solving it: Abyssian Fortress, 2S.

The basis of this room is that there are these nine 4×4 cells of tarstuff, three of each of the three varieties (tar, mud, and gel). The only monsters in the room are the Mothers in each cell, visible as a pair of eyes, that make the tarstuff expand every 30 turns, although the way they’re penned in here keeps them from expanding. Access out of the room is controlled by force arrows and a black gate, which only opens when all the tarstuff in the room has been cleared. And most of the floor is missing, so you have to get around by means of a 4×4 raft. So far, so straightforward. This much makes it a solid but not-too-difficult tar-clearing puzzle. The only tricky part is the gel. Gel is only vulnerable at its interior corners, but the cells here don’t have any. To get started, you have to create some by letting the gel expand onto your raft, which immobilizes the raft until it’s cleared. But even that’s just low-level tactics.

The difficulties come in with some things you have to step on to get started. First of all, there’s a disarm token, which takes away your sword. Stepping on a disarm token again restores your sword, but the force arrows around the token here prevent you from doing that. Then there’s a mimic potion, which lets you place a mimic on any clear spot on the floor. Mimics imitate your movements, and are armed with swords, so you can use that to clear the tar even when disarmed. But the circumstances suggested another possibility: what happens when a mimic steps on a disarm token? I knew that there exist things that mimics trigger just as if you had stepped on them. So I tried this, and sure enough, I got my sword back. Unfortunately, that left me in a difficult position for the next obstacle: the bridge.

Bridges are another new concept in TCB. They act kind of like level 2 of Donkey Kong: you can remove the supports by walking on them. (In fact, the game reuses the familiar trap door tiles to represent the supports.) Once the supports are all gone, the whole thing collapses, killing anything on it, including Beethro if you’re foolish enough to step back onto the bridge from the last support. In this room, there’s a bridge that’s blocking the raft from moving, and the trap door to collapse it is on the opposite end of the bridge from the raft. Getting a mimic from the disarm token all the way to the other side of the bridge without going there yourself seems impossible — the only way to enlarge the distance between yourself and a mimic is to move in a way the mimic can’t, typically by pulling it against a wall, and there are no suitably-positioned walls in that part of the room. Doing it the opposite way, collapsing the bridge personally and leaving the mimic on the raft, is feasible, but leaves you stranded on a little 2×2 platform, without enough movement room to make the mimic navigate the raft over to you. No, the easier approach, I decided, was to create the mimic on the 2×2 platform where it could free the raft, and remain swordless while it fought the tar for me.

At first, I tried just standing on the raft with the mimic while it fought the tar, but it proved difficult to protect my defenseless body this way. Eventually I got a bright idea: There’s another raft over on the right side. If I got that free, the mimic could take one raft into the fighting zones while I stand on the other, a comfortable distance away. This worked, and I cleared the level through, in effect, remote telepresence. But there were still things about the puzzle that I didn’t understand. For starters, there’s a red gate over on the right side, enclosing the platform corresponding to the one I didn’t want to get stuck on in the previous paragraph. Why is that there? It controls access to an empty space. I cleared the room without opening it. It could be a mere red herring, but DROD doesn’t usually go in for that. Or when it does, it does it with things that give you the wrong idea about a puzzle and cause you to attempt it the wrong way, not with confusing elements that don’t suggest a solution at all.

And then, after you solve the room, there’s a Challenge scroll. The challenge: Clear the room without moving the mimic over the disarm token. In other words, the thing that I had decided was impossible is apparently the normal solution. I feel like I still haven’t solved this room, despite having solved it the hard way. And I have no idea which way I solved it the first time through.

TCB: Mothingness

While I’m semi-stuck in the later, more difficult levels of The City Beneath, let’s take a moment to talk a little about the one recurring character I haven’t said much about: the Pit Thing. This is a booming voice that occasionally speaks to Beethro from the depths of the vast chasms you occasionally find while exploring. Sometimes there are a few eyes on pillars in the middle of the pit, using the same sprite as Evil Eyes but not flagged as monsters. I suppose the implication is that they’re part of the Pit Thing, part of how it learns what’s going on in the world. It definitely has some source of information, because it knows a great deal about Beethro.

The Pit Thing first made itself known back in Journey to Rooted Hold, where it didn’t show much of a sign of personality or motivation. Its dialogue was a mixture of taunts, gibberish, and fruitless attempts to talk Beethro into jumping into the pit. That last theme continues somewhat in TCB, with the Pit Thing pointing out that if Beethro really wants to reach Lowest Point, straight down is the fastest route. Given DROD’s sense of irony, I half-suspect that we’ll eventually learn that the pit has an anti-gravity field or an enormous trampoline or something at the bottom, and that Beethro could have saved himself a lot of trouble by just following the Pit Thing’s advice.

For the most part, though, the Pit Thing seems less insane this time around, and at least a little concerned with guiding Beethro towards discovering the secrets of the underground. At one point, progress is contingent on the Pit Thing’s help, when Beethro gets access to the imperial library but doesn’t know what topic to look up. The Pit Thing guides him to the one part of the Library that’s in the process of being destroyed by briars. It does this, it claims, to teach us a lesson about Mothingness.

“Mothingness” was mentioned in JtRH, but I had frankly forgotten about it by the time TCB came out, and only noticed it this time around because I was watching for it. It just didn’t seem important there, just another nonsense word, or, more likely, a typo. But in TCB, it’s the central concept of the Pit Thing’s message. Mothingness is essential to the actions of the Empire. The citizens don’t know about the mothingness, but it’s “soaked into their flesh”, invisible and unavoidable. What is it? The Pit Thing prefers to teach by example, much to Beethro’s annoyance, so we don’t have a definition. The clearest statement we get comes when the Pit Thing is talking about the Archivist faction: “The Archivists have two jobs. One that was given to them, and one they gave themselves. They were told to collect information, but when they listened more deeply to the mothingness, the mothingness told them to collect all information.” We see the result shortly afterward: a war of extermination on the surface-dwellers, because only when they’re all dead can the Archivists’ records be permanently complete.

What is mothingness? Based on these two examples, I’d describe it as something like “things not going as planned”. Mothingness is entropy, code decay, perverse incentives. It’s the system’s inherent problems building up until things reach a crisis point, and then the system continuing anyway, a parody of its former self, its original purpose lost. Mothingness now rules the Empire, which has become a Recorded Information Maximizer, in the same sense as Paperclip Maximizer.

The Pit Thing sees the sparks that fly when Beethro comes into contact with mothingness, and is amused, and encourages further contact. And so the husk of an empire begins to fall.

TCB: Swordlessness

I’ve talked about this before, but it’s impressing me anew: in comparison to other DRODs, it’s striking how much of The City Beneath is spent without using your sword. It’s not just the time you take exploring the city proper, where you’re forced to keep your sword in its sheath lest it be devoured by oremites. It’s also the way that the new game elements provide other things for the puzzles to be about. Take the rafts and floating platforms, which are really the same thing in two different contexts. A raft or floating platform is a contiguous group of floor tiles that move under your control when you’re on them, provided that there’s nothing in the way. 1That’s a bit of a simplification, but I’ll spare you the details. Once that’s in the level designer’s toolkit, they can use it to make polyomino assembly puzzles that you solve from the inside. You don’t need a sword for that.

In a weird way, it reminds me of Portal 2. There was reportedly a point in the development of Portal 2 when the developers were seriously contemplating leaving the portal gun out, because they had a number of other novel mechanisms to replace it with, such as magic paint. But they wound up including the portal gun as the means by which you interact with the other novel mechanisms. TCB sort of does it the other way around: using your sword is the goal, the thing that the other puzzle-solving is done in service of. But then, the game also introduces new ways to kill things without using your sword, such as leading them onto hot tiles, or knocking out the supports of a bridge, or letting them step on your raft and then pulling it out from under them.

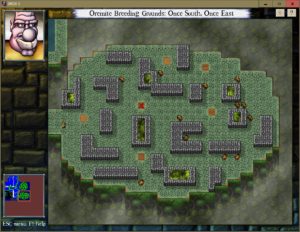
I mentioned oremites. When you first learn about the city’s oremite infestation, it seems like they’re nothing more than a tongue-in-cheek in-game excuse for the narrative decision to keep Beethro from killing important NPCs. But fairly late in the game, there’s a level called “Oremite Breeding Grounds”. Here, most of the floor is covered with oremite nests, except for a few tiles — and consequently, those are the only tiles where you can draw your sword. The puzzles are thus all about getting monsters over to the places where you can kill them, with enough time to turn to face the right way once you get there. I just love how it turns what seemed like a throwaway joke into a mechanic that produces puzzles, and I especially love how long it waits between introducing the concept of oremites and paying it off in this way.

I mentioned the sequence where you play as the Negotiator, who doesn’t even have a weapon, and has to kill monsters by controlling Fegundos. There’s a second such interlude where you control a goblin, who doesn’t have a sword, but who’s capable of killing things anyway (as we know from the puzzles where Beethro fights goblins). This is the sequence that introduces Aumtliches, the Empire’s latest vat-grown weapon of war. An Aumtlich’s eyes emit glowing, sparking beams that paralyze you if they touch you, leaving you able to turn in place but not able to flee. There’s a sense of powerlessness there that’s worse than simply being killed outright, and the player learns to fear the sound effect that accompanies getting stuck in the beams. And it all leads up to the moment when you get Beethro back, and have a sword again. To emphasize the importance of this, Beethro has to surrender his sword to be allowed into a military encampment just before the goblin sequence, and it’s only returned after that’s over. It’s important because, as we soon discover, your sword can block Aumtlich beams, or even reflect them back. You can still get stuck without recourse, but only if you stand in a place where two beams cross, so that you can’t block them both at once. Even so, being able to block them at all feels like a superpower after experiencing helplessness as a goblin. At first, I took care to orient my sword correctly before stepping into a beam, just to avoid the scary noise it would trigger otherwise. But the game gradually makes this impossible, and after a while, you learn to not let it bother you.

References
1 That’s a bit of a simplification, but I’ll spare you the details.

The City Beneath: Gate of Namedness

I’m managing to replay The City Beneath at a pretty good clip — I haven’t gotten to the harder levels yet, but I’m pretty sure that the game is overall much easier than Journey to Rooted Hold, even with the Challenges. The central organizing structure of the game is that your progress through the city is blocked by sundry obstacles requiring subquests. You explore more or less freely for a while, triggering plot events as you go, and then, when you can’t do that any more, you go off and solve a series of puzzle-rooms, then come back and resume exploring. The most significant of these obstacles is a series of three great gates. I’ve just passed the second one. This doesn’t mean I’m two-thirds of the way through the game; the first gate comes at the very beginning, and only requires that you sheathe your sword to pass. Also, I recall there’s a significant number of levels after the third gate. Still, it’s good progress.

The second gate is called the Gate of Namedness. The only people allowed through are citizens with names, which is to say, jobs, those two concepts being synonymous in the Empire. As an above-grounder, Beethro is automatically ineligible for this status, until the Negotiator moves heaven and earth to get the law changed. Really, Beethro severely underappreciates that woman. He remains as hostile towards her as he was when they first met, just as he remains belligerent towards everything in the Empire, even the people who are trying to help him. Nonetheless, getting deeper into the city requires him to integrate himself into the Empire’s systems, at least nominally.

I described the process of obtaining a name during my first pass through the game. Beethro applies for the post of Slayer. There are five other applicants for the position, and they all compete for the job with a fight to the death, in which everyone else naturally agrees to target the above-grounder first. Now, the room contains an obvious mechanism for beating them, involving a bomb and a decoy potion. But this time around, there’s a Challenge scroll, which predictably asks you to do without these aids.

I am of course an expert Slayer-killer by now, thanks to the Challenges in JtRH. What once seemed impossible is now child’s play. But there’s a particular difficulty with taking on five at once, and oddly enough, it’s exactly what made the same fight so surprisingly easy back in 2007: the tendency of the Slayers to bunch up. When you’re trying to get them to cluster together around a bomb, that’s helpful. When you’re trying to manually pick them off one by one, not so much. You want them isolated. The act of getting past a Slayer’s guard with nothing but a sword and a wall is a delicate dance, with precise timing, and easily ruined by another Slayer barging in from the wings. The first kill I managed was almost entirely accidental. Somehow, an interloper wound up in a position I could take advantage of. I have no idea how that happened, but it was a big help. Each enemy you take down makes the rest that much easier.

DROD: The City Beneath… again

So! Replaying DROD: The City Beneath. This puts me in the new position of blogging a game that I’ve already blogged. Well, it’s been, good grief, ten years since those posts. My perspective will be different.

Coming on the heels of Journey to Rooted Hold, the most noticeable difference is that it isn’t simply a series of levels any more. JtRH played with nonlinearity a little, giving us up staircases and quests that looped back to previous levels, but the notion of “previous level” doesn’t even apply very well to TCB. Grouping rooms into levels is still important for the game’s organization, if only because of the “level clear” gates, but levels here are named, not numbered, and only partially ordered. I seem to recall that the later parts of the game turn into a linear descent like the previous titles, but for now, it’s hub-and-wheel, with some forking. And, while I recall once pooh-poohing the significance of the hub to the whole, it seems impressively large to me right now.

I had forgotten that the Negotiator from the beginning of JtRH shows up again here, in an expanded role. She turns out to be a bit of a rebel, in her own bureaucratically-bound way, and actually does a lot to help Beethro along, even though he doesn’t appreciate it. More importantly, you get to play as her for a little while, in an interlude between Beethro’s scenes, tutorializing the use of the Fegundo. Switching characters mid-game like this is a new feature for DROD.

And of course there are challenge scrolls now! As before, I’m trying to tackle all challenges as I find them. So far, I’ve found one worth describing briefly here. Recall that TCB contains occasional appearances by Slayer trainees, eager for promotion. In behavior, they’re just like the Slayer from JtRH, but they’re stupid enough to approach Beethro in rooms where they can be killed easily. The first such encounter is in a room full of “hot tiles”, which kill anything that steps on them and doesn’t step off on its next move. This makes killing the Slayer there not just easy, but nearly automatic. Once he gets close enough to be a threat, he’ll pause to reorient his weapon, and consequently die. So the Challenge there is: Keep the Slayer alive. So neat, so elegant.

Those hot tiles are just one of a bevy of new environmental features. I feel like the introduction of new stuff has accelerated. Yes, JtRH had new elements, but not this many, not this fast. And a fair number of them were new monsters, some of which were variations on stuff from King Dugan’s Dungeon, like Rattlesnakes and Awakened Mud. Whereas TCB is focusing less on new monsters and more on new room features that let you interact in new ways. Consider mirrors. These are things capable of reflecting the gaze of an Evil Eye (or, later, an Aumtlich), and which Beethro can push around the floor to block passageways or weigh down pressure plates (themselves a new element). They’re a bit Sokoban-like, except that Beethro can use his sword to push them around corners. The point is, the previous two games didn’t have anything remotely like them. I feel like JtRH was basically about fulfilling the potential that the familiar DROD ruleset obviously had but didn’t quite live up to in KDD, while TCB is more about striking off into fresh territory, and discovering new potential in the unfamiliar.

Older Posts »