The Second Sky: Time Mastery

Another level of those Braid-style cooperate-with-your-past-self puzzles. Let me say a little more about how this mechanism affects and is affected by DROD.

This type of puzzle is fundamentally about executing a plan without being able to see its effects. In the simplest cases, you go forth from the temporal split point and do things that will benefit you after you rewind, like standing on pressure plates to open doors for your future self to go through, taking care to anticipate how long you’ll need to stand on each plate. But your future self can do things that affect your past self, too. Suppose there’s a pressure plate that opens a door, and on the other side of that door there’s an orb that releases a dungeon roach near the pressure plate. If it kills your past self standing on the plate, you die. So your past self has to be prepared to deal with that roach, even though it can only play back a repeat of recorded actions. When you set out from the temporal split point the first time, you wave your sword in the air in the place where you know the roach will be. The actions will remain the same, but circumstances will change their meaning. This is a rich ground for puzzles.

Now, roaches are simple and predictable, and easy to plan for. But there are monsters that run on subtler and more complicated algorithms, like serpents and goblins and soldiers. My usual approach when fighting these things is to take it a turn at a time and undo a lot. I don’t have a perfect model of their behavior in my head, so I have to keep correcting my course. Temporal split tokens can make this habit unworkable. You can’t take things a turn at a time when you have to do everything in advance. Thus, puzzles using temporal split tokens have the potential to require complete mastery of the game’s increasingly complex systems in a way that other puzzles don’t.

Mercifully, the game so far hasn’t much explored this potential. I’ve seen one puzzle that pits you against future goblins, but that was in a secret room, which means it’s allowed to be unusually hard.

The Second Sky: Stuck in Time

My earlier speculation is coming true: time travel and time-rewinding powers are becoming a more and more prominent part of both puzzle and plot. There’s an entire level, the Chronometric Sanctum, based around the same sort of accretive time-rewinding single-player-co-op puzzles as that one level of Braid, or P. B. Winterbottom, or Cursor x 10. Or a lot of other imitators. But never mind that it’s been done before. Combining it with DROD gameplay makes it new. One room uses trap doors to recreate the famous Seven Bridges of Königsberg problem, impossible in real life, easy when you have the help of your past self.

I say “an entire level”, but it’s really two levels: the same location in two time periods, which you can travel between via a larger version of the time-rewind tokens you use within the puzzles. There are rooms you can reach in both time periods, but they’re pristine and new in one period and overgrown ruins in the other, with crumbling walls and collapsed walkways and rusted-shut doors. I guess it’s an application of the King Dugan’s Dungeon Floor 6 pattern, reusing layouts while completely changing the puzzles.

I spent more time than I would have liked stuck here, and stuck in a way that’s unusual for DROD. I had cleared all the rooms on the level, but there didn’t seem to be a way forward. I just didn’t know where to go or what to do. I couldn’t even escape the way I came — as in the mines, the entrance seals behind you. The secret turned out to be that one room has a pressure plate hidden under one of the temporal split tokens. It’s a room where you don’t actually have to use the token otherwise, but it makes sense that it’s there anyway because it’s part of the puzzle in the room’s other version, in the other time period. The game UI helps you find the triggers for each door by highlighting them when you click on the door, but usually I use that to answer the question “Which of the various orbs and pressure plates I can see on this level controls the door?”. This is the first time I can think of that I needed to click on a door to see the controls at all.

After completing this section, the game starts linking levels together with time portals in the form of swirling vortices in the air. The first such portal sends you to the distant past, separating you from everyone and everything you’ve become familiar with through the story so far — except for the Critic, who still inexplicably manages to find you anyway.

In the wilderness that follows, you’re switched to another new weapon, the dagger. Like the spear, the dagger is a poking weapon. Unlike the spear, you can’t push things laterally with it. It doesn’t block monsters moving into its space, with the result that you can sometimes kill two in one blow: the one in the space it’s in, and the one in the space it moves to. But the most important thing about the dagger is that it lets you move like you’re unarmed. Moving in any direction automatically pivots you to face that way, whether you want to or not. This takes some getting used to, and reduces your capabilities somewhat. For example, it makes it impossible to push powder kegs around: pushing a thing means moving towards it, which automatically makes you face it, and moving towards a keg dagger-first means attacking it, which makes it explode.

The level that introduces the dagger does a peculiar thing: it contains features that are clearly meant for someone with a different weapon. One room has a red gate, which only opens when you’ve dropped all the trap doors in the room, but, just like when you’re unarmed, you don’t weigh enough to drop trap doors when you’re using the dagger. Another has a fuse and a set of powder kegs that could be pushed into a position to blast through a wall, if you could push them. It’s possible that this is just more trolling, but I suspect that this will all lead to revisiting the same rooms with a sword later, similar to the Chronometric Sanctum. Even before the time-travel stuff, there were some paired levels like that: The Easy Way and The Hard Way consisted of two versions of the same set of rooms.

I say that having gotten through the level. While getting through it, it seemed more likely that I’d get my sword back before leaving. Partly that’s because the very last room in the level has a very clear sword-only solution, and seems impossible with a dagger. It contains a small room filled with monsters on a ring of force arrows, isolated from where you can go. A potion nearby lets you drop a mimic inside the ring, where it could spin in place and kill everything if it had a weapon with an edge. It took me a good long time to figure that one out — it relies on a specific edge case in how mimics with daggers work. And, as in the Sanctum, I spent much of that time just wandering around the level, looking for I know not what.

The Second Sky: Jumping Three

Still in that mine. I’ll probably move on tonight, just to start making progress again, but it’s a little galling to leave with just one puzzle left undone. It’s a doozy of a puzzle, at least. Just as seemingly-impossible as killing the Slayer in Journey to Rooted Hold. I mentioned in my last post how you can use a mimic with a pickaxe to move two spaces on one turn. This puzzle comes down to using two mimics with pickaxes to move three spaces.

I won’t post a screenshot of the room here, because I’ve already posted one. The central problem here is that you need to get through two rows of pressure plates to reach the monsters. The first row opens a door on the right that lets a monster onto another pressure plate that makes it impossible to finish the puzzle. The second row of pressure plates closes that door, but if you just walk from one plate to another, it’ll be too late. The monster will already be through the door. The only way to keep it from getting through is to close the door on the same turn that you open it. That means walking three squares north in one go.

Now, the obvious approach is to take the solution for moving two spaces with one mimic and iterate it: you move forward, the mimic behind you moves forward and gives you a push, the mimic behind it moves forward and gives the first mimic a push which causes it to push you again. (It must be noted pushing a mimic stuns it for that turn, preventing it from moving under its own power. So the movement sequence has to go from front to back, and that means that Beethro, who initiates the movement, has to go in front.) But there are complications. Mainly, that the two-step solution requires a trick that isn’t easily chained. A mimic tries to move exactly like you, and that means preserving its distance from you. You can’t push something while preserving your distance to it; that’s following, not pushing. So you have to trick the mimic into moving closer to you by exploiting obstacles that keep it from imitating your moves exactly. If you move northwest, and the mimic can’t move northwest because there’s a pit there, it’ll move straight north instead. This can push you, if you started in the right place. But the second mimic can’t pull the same trick on the first. If it’s directly behind the first, so that it also moves north, it’ll just preserve its distance. If it’s to the southeast, it’ll try to push the first mimic northwest, which might wind up pushing it north instead if the obstacle to the northwest is solid. But in this puzzle, it’ll just successfully push it northwest into the pit.

There’s one technique I’ve found that gets around this partially. I call it spring-loading. If mimic A tries to push mimic B north, and there’s a solid obstacle directly north of mimic B, then B cannot be pushed and it’ll wind up occupying the same space as A’s pickaxe. (Weapons occupying filled spaces is not unusual; Beethro has always been able to swing his sword into walls.) They are now in a configuration that lets mimic B move north two squares: B moves north, winding up directly in front of A’s pickaxe, then A pushes B north. Of course, in order to actually do this, the obstacle to the north has to go away. But we have one movable object that counts as a solid obstacle: Beethro, as long as you’re not moving weapon-first. The problem then becomes that we need Beethro to be an obstacle one turn and then push him with a pickaxe the next.

However, with the right placement, this is doable! And I have in fact successfully used spring-loading to move Beethro three squares at a time. The only problem is that I can only do it in a place where there are obstacles to both the left and right, and that’s a condition that only exists too far from the pressure plates to do any good. I suspect that the solution involves somehow using those obstacles at the back end of your chain and extending your reach a little by pushing the room’s lone powder keg ahead of you, like the puck in a game of recursive hockey.

Anyway, the important thing is that I’ve written all that down, and thus feel like I can move ahead without losing my progress toward figuring it out.

The Second Sky: Secrets of the Shattered Mine

I’m still in that mine, but at least my lack of progress is once again elective. I’ve opened the exit, but I’m hanging back to figure out the level’s two Secret Rooms.

They’re hardly Secret at all, really. The level has an obvious structure, two rows of rooms on either side of large chasm with a circuitous network of rickety walkways over it. Any room-sized gap in those rows begs to be filled. On top of that, you can in a sense visit the Secret Rooms early, via passages that loop back into isolated pockets that let you look at the puzzle content without being able to reach it. Where other levels hide their secrets, this one throws them at you as a dare. This may have something to do with my insistence on completing them before moving on.

These Secret Rooms aren’t just sealed behind a crumbly wall in the hope that you won’t notice them. Their entrances are guarded by secondary puzzles in other rooms, requiring you to solve the room again in a harder way. The presence of these antechamber puzzles is obvious, marked by an opposed pair of room-clear gates acting as a sort of airlock. If you can solve this puzzle, it gives you extra motivation to solve the puzzle beyond it. If you can’t, you have no business attempting it yet.

The level’s puzzle theme has three elements. First, the pickaxe, a new weapon that’s basically the dual of the spear: sharp sides and a blunt tip, so it kills when it swings and pushes when it pokes. Then there’s the powder kegs, which are small bombs that you can push around. (It’s good to finally have another pushable item, by the way. The City Beneath had pushable mirrors, and it always seemed a little weird that mirrors were the only things you could push, because it meant it often didn’t really matter that they were mirrors. Whenever the level designers needed an object to weigh down a pressure plate, they used a mirror, because that’s what was available to them.) Finally, there are mimics, which imitate your movements. Mimics aren’t new, but they’re thrown in because they interact with pickaxes and powder kegs in unintuitive ways. For example, if you arrange things right, a mimic with a pickaxe can push you, allowing you to move two squares on a single turn.

A pickaxe enhances your pushing ability a little, letting you stand oblique to the push direction, but not nearly as much as the stick or the spear, which let you push laterally or even angularly. Here, you can only push from behind. Most of the rooms here have random decorative powder kegs stacked in corners and crannies where they’re unpushable and the only way to interact with them is by accidentally blowing them up. Occasionally, though, one will be placed in a way that you can get behind diagonally. Maybe it’s not easy to get there. Maybe you have to do something tricky involving a mimic first. But once you do, you have an extra tool for solving the room, one that wasn’t obvious at first glance. It strikes me that the use of irregular jagged-walls-and-random-boulders terrain is similar: any bump or protrusion might be the crucial thing you need to catch a mimic against to make it move the way you want, and the fact that there are such irregularities all over the place means it’s not obvious which ones are important. The reason that the level can get away with so much obviousness in its secrets is that it’s sneaky at a lower level. This contrasts greatly with the Tar Recycling Annex, which kept things highly regular in order to keep the player’s attention where it needed to be.

The Second Sky: Progressively Greater Stuck

I spent most of the time since my last post semi-stuck — “semi” because I had the option of unsticking myself at any time. There was an obvious path forward, and I wasn’t taking it. You know how there are extra-hard secret rooms? I had found an entire secret level, an extravagance that DROD generally saves for after Mastery.

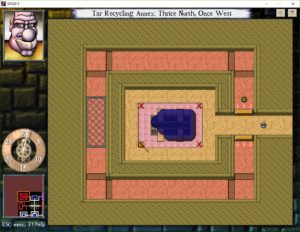
Named “Tar Recycling Annex”, it was all about the way tar interacts with spike traps, which destroy it by the same rules as your sword. As a well-regulated imperial sub-system, there’s a uniformity to the rooms here. In every room, there’s a tar/spike chamber with a walkway around it, gated by pressure plates, and you have to get the tar to weigh down the right pressure plates for long enough to let you walk all the way around the walkway and reach a conquest token.

Conquest tokens have been part of the DROD for a few episodes now, but it seems to me that The Second Sky uses them more extensively than prior games. The idea is that they add an extra requirement to a puzzle: in addition to slaying all the monsters, you also have to step on the conquest tokens. There have even been puzzles with just the tokens and no monsters. Now, for most puzzle designs, they’re not absolutely necessary. If you want the player to go to a particular spot, you can put a roach in a corner and immobilize it with a force arrow, or put an orb there that opens the exit door, or various other tricks familiar to the experienced DROD player. The choice to use conquest tokens here is purely an aesthetic and thematic one. The feel of these rooms is stable, controlled, and mechanized. That means no extraneous monsters and no human conveniences.

Anyway, these rooms are hard. And there’s even a harder variant of one of the harder ones in a secret room. If I were still doing replays, I’d probably still be stubbornly refusing to move on, but since there’s still so much of the game I haven’t seen yet, I ditched with only half the level completed, something I don’t usually do in DROD because DROD doesn’t usually give you opportunities to do it. But The Second Sky encourages the player to skip around from level to level more than usual. Sure, there’s always been the Restore menu, letting you go back to any checkpoint you’ve hit, but now there’s also a world map, accessible whenever you exit a level, that makes it easy to revisit levels without losing state. So I was confident that I’d be able to go back and try to recycle more tar whenever I wanted.

What followed was a rather impressive bit of trollery on the part of the developers. Spoilers follow.

For most of the game to this point, there’s been a countdown to the Turning. It starts at over 200 days, and ticks down several days every time Beethro has to travel a significant distance. When I entered the Tar Recycling Annex, the countdown was at 98 days. But the moment I decided to start advancing the plot again, the Genocidal Madman Formerly Known as First Archivist managed to find a control room that let him accelerate the schedule. The world is basically destroyed, the map is wiped, and Beethro is stuck in an abandoned mine. And when I say “stuck”, I mean he can’t even leave the way he came. The only way out is forward, through more difficult puzzles.

It took me a while to realize just how inaccessible the previous levels had become. I can still go back via the Restore menu, of course, but I still hold some hope that I’ll be able to make the Turning unhappen and handle unfinished business diegetically. That’s because of the time beacons. The game has not only introduced a mechanism for rewinding time (in a small, local way), it’s made a point of discussing it in a cutscene, making it a part of the plot. That has to be leading somewhere.

The Second Sky: Weapons

We do of course get a steady diet of new monsters and terrain features as the game goes on. Notable additions include spike traps that spring up and kill things every ten turns, temporal beacons that let you deliberately return rooms to their unsolved state to enable elaborate Room Clear/Level Clear gate shenanigans, and Fluff, a sort of aerial tarstuff with enough novel properties to fill a blog post of its own. But there’s one addition that has me particularly interested, because it’s a completely new category of thing for the designers to experiment with: weapons.

In a sense, this isn’t entirely new. The City Beneath gave us one other alternate weapon, that being the null weapon, the state of being weaponless. Also, the idea was played with a bit in Wonderquest, the one game I know of that outright imitates DROD‘s mechanics. Wonderquest had this notion that you were playing as a party of multiple characters with different abilities, and some of those characters had different weapons; I remember in particular one that had a staff that extended in two opposite directions. You only had one character in play at a time, though, and switched among them by stepping on tokens on the floor. It mainly used this to limit access to characters, making the ones you needed difficult to access.

DROD‘s weapon-switching is also based around stepping on tokens, but so far, it’s mainly used this to force you to switch to weapons you don’t want, ones that are less powerful than the default Really Big Sword. The first alternative you get is a mere wooden stick, incapable of killing anything directly. Hitting something with a stick briefly stuns it, and pushes it to an adjacent space if there’s room. Mind you, this can be enough to kill things. Just push it off a cliff, or into a hazard like a spike trap. And the ability to push monsters around isn’t nothing. There are loads of puzzles throughout the DROD series about getting monsters to go where they’re useful to you, and previously, the only way to do this was to make them chase you there.

The second weapon you get is a spear. This is capable of killing things, but only with poking movements. Hit a monster with the side and it just acts like a stick. In a way, this seems like the best of both worlds, because you can both kill and push with it. But so much of my monster-slaying technique relies on swings and side-steps and back-swipes that you can only do with the sword. Killing with a spear is just a great deal less efficient. If you want to stand your ground, you have to keep backing up to do it.

That’s all I’ve found. I expect there will be more, maybe even the long-anticipated ray gun. That’s an old in-joke from the Caravel forums — the ray gun is the canonical example of a player’s request for a feature that would ruin the game by making it too easy. But I trust that the designers would find ways of making a ray gun into a liability.

After all, they’ve found ways to make the obviously inferior weapons better than your sword.

It all comes down to the immense variety of game elements and how they interact. Some monsters, like Gentryii or Wubbas, are invulnerable to damage. If you hit them with your sword, it just does nothing. If you hit them with a stick, it pushes them just like it pushes anything else. So the stick is a better choice than the sword against them. And as for the spear, I’ve recently discovered that it has a secret virtue: it can damage tarstuff at any point, without regard to edge or corner. These things aren’t inferior. They’re specialized.

The Second Sky: The People of the Empire

The intro level to DROD: The Second Sky makes First Chemist seem like an important character, but he disappears after that. Presumably he has chemist business to attend back at the vats while Beethro ventures out looking for more answers. He’s replaced by an array of minor characters, the sort of whimsical and eccentric cast that’s become one of DROD’s trademarks. There are the Truth Vessels, occasionally catching up to report on their findings in their technical-sounding gibberish. There’s a Critic, who just shows up to make disappointed comments about your puzzle-solving — she’s kind of like the watchers from Journey to Rooted Hold, except that her complaints are ones you can’t act on: “Your sword is too big”, for example. (Perhaps a reaction to discussion threads?) On one level, a woman repeatedly pops in to inform you that you’ll never be able to steal her precious diamond doily. Beethro protests that he has no intention of even trying, although eventually her accusations arouse his curiosity about it. The Pit Thing is still around, as pit-thingy as ever.

And there’s a recurring antagonist, the first we’ve seen since the Slayer in Journey to Rooted Hold. In behavior, however, he’s less like the Slayer and more like the final bosses in all the other DROD games: instead of engaging you in combat directly, he keeps his distance, opening and closing doors to force you into traps. He’s the one who sends Beethro into the Gentryii dungeon. His name: First Archivist, leader of the faction that unleashed the Aumtlichs on the surface-dwellers back in The City Beneath.

He’s not the one who ordered that attack, however. He was Second Archivist back then. The previous First Archivist, the one who sent the Aumtlichs to war, is still around, but powerless and nameless. I haven’t yet learned exactly how or why he was deposed. Presumably it has to do with his failed attempt at genocide, but which is the factor that led to his downfall: the genocide or the failure?

At this point, I’m thinking the former, because the more we learn about the Empire, the more it turns out that they’re mostly not bad people, just weird and secretive and sometimes under the sway of Mothingness. Previous First Archivist’s attitudes may well be atypical; indeed, Halph’s big project for the Empire turns out to be a plan to save the surface-dwellers from an imminent cataclysm called “the Turning”. Beethro got off on the wrong foot with everyone with the whole “leave or we’ll send the Slayer after you” thing, but even he’s starting to mellow towards them. He cooperates with First Chemist without making snarky comments about it. Back in TCB, when Beethro briefly returns to Dugandy and discovers that his associate Bombus Gadhan is collaborating with the Empire, he flies into a rage, accuses Bombus of treason, and winds up fighting and then escaping from the Dugandy royal guard. When he returns to Dugandy again in TSS, it’s to sit down and talk to Bombus, and pool their knowledge about what’s going on.

So if the people of the Empire aren’t just automatically evil, we have to ask: why is New First Archivist trying to kill Beethro? If I understand correctly, the sole reason is that when they first meet, Beethro automatically assumes that he’s an enemy just like Previous First Archivist, and as a result is rude to him, then refuses to apologize. And while First Archivist’s response to this is wildly disproportional, it has to be said that Beethro could have spared himself a great deal of effort and grief (and deprived the player of some wicked puzzles) by just apologizing. Beethro has a talent for making trouble for himself. I kind of suspect that his slapdash efforts at saving the surfacers are going to collide with Halph’s at some point, leaving them both in ruins, like Guybrush and Elaine. But even if so, not all the blame will lie on Beethro. What we have, in both this hypothetical and in the plot generally, is a failure to communicate. And Beethro is at least making an effort in that department, what with learning a new language.

DROD: The Second Sky

It’s been nearly a year since I decided to give the first four DROD games a quick play-through in preparation for tackling the fifth. Let’s get on with it, shall we? Forth into the unknown!

But not into the expected unknown. Given the title The Second Sky, I thought that we’d be exploring the world that Beethro finds past Lowest Point at the end of The City Beneath, but that hasn’t happened yet. Instead, we get a time skip of at least a month. Beethro is a wanted criminal in the Empire now, but has formed an alliance with a previously-unseen character named First Chemist. Together, they have a plan to save the surface-dwellers that involves “Truth Vessels”, vat-grown people who are incapable of saying anything false — although they can only speak and understand a goofy-sounding language called “true speech”. Beethro has learned this language. So, quite a lot has happened offscreen, and it’s revealed to the player as part of the “story so far” summary, in exactly the same format as the familiar stuff from the previous games: a series of brief cutscene fragments with expository voice-overs between them, like clips in a trailer, with no division between the old stuff and the new.

To be honest, I suspect that the unfamiliar portions come from the “Smitemaster’s Selection” expansions, which I haven’t (yet) played. If so, this is the first time the Selections have had crucial relevance to the main titles. But I kind of like the the idea of a fake “Previously On” sequence that mixes in items that weren’t actually previously on.

I’m only a few levels into the game proper at this point. We start with a whirlwind reintroduction to the basic game elements. Just as I observed when playing Gunthro and the Epic Blunder, what exactly constitutes the basics varies from game to game. Things that were unfamiliar to Beethro a couple of games ago, such as adders and pressure plates, he now treats as common knowledge. He does comment on not yet being used to the idea of force arrows that can be turned on and off, but that’s because that’s something new to this game.

I’ve gotten just far enough to see the first really major new game element: the Gentryii. These are essentially droddified versions of the Chain Chomps from Mario: indestructible animated metal balls with sharp teeth, products of hubris in a bygone age, chained to the walls of a dungeon and sealed away when they couldn’t be killed. The chains snake around from tile to tile in a way that makes them seem at first like a new variety of Serpent, but they’re really very different from serpents mechanically. Serpents move at right angles, trailing their bodies behind them, like in the classic Snake game. Gentryii chains can lie diagonally, and they’re (usually) fixed at one end, so that the tension of the Gentryii pulling at the other end can straighten out convolutions. This makes it difficult to get them usefully stuck. Yes, you can avoid getting killed by a Gentryii by just staying beyond the chain’s reach, but sometimes they’re positioned right where you need to go, like guard dogs, with the chain preventing them from leaving their post. Part of the trick here is that the chain itself acts as an obstacle. Beethro can’t cross it, but neither can the Gentryii.

In fact, if I’m not mistaken, the Gentryii chain is the only sort of obstacle I’ve seen that can’t be crossed diagonally. Usually, if two diagonally adjacent tiles are both empty, you can move from one to the other, even if the two tiles neighboring them are solid walls. Even the gaze of an Evil Eye or an Aumtlich can be crossed without triggering when it’s on a slant. But a Gentryii chain is impermeable. You can still stab monsters through it, though.

More tomorrow. I’ll probably have something to say about the characters.

« Newer Posts